
A quick tutorial video for t1i
Saturday, October 31, 2009
Powered by Blogger Tutorials
Anatomy of digital t1i or canon eos 500d
Anatomy of Canon eos 500d or rebel t1i
In the previous post you saw how you can use the Rebel T1i’s
automatic features for easy snapshot shooting. Before we go on to
learn about its more advanced shooting features, we’re going to
take a tour of the camera and learn its parts. The T1i is a complex
tool, and the better you know its workings, the more easily and
effectively you’ll be able to make it do what you want.
What Is an SLR Anyway?
The Rebel T1i is an SLR camera, a term you may have come across when you were
shopping. SLR stands for single lens reflex, and those words tell you some important
things about how the camera operates.
As the name implies, a single lens reflex camera has only one lens on it. If you’re
wondering why a camera might have two lenses, consider a point-and-shoot
camera. On the front of a lot of point-and-shoot cameras, you’ll see two lenses,
one that is used to expose the image sensor and a separate lens that serves as a
viewfinder. Because it’s very simple to engineer and doesn’t take up much space,
a point-and-shoot camera can be made very small.
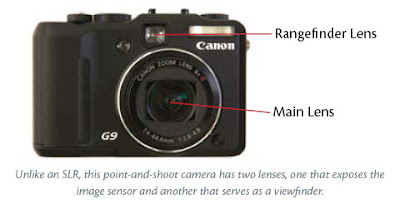
The downside to this setup is that when you look through the viewfinder, you’re
not necessarily seeing the same thing the camera’s image sensor sees. You’re not
seeing the effects of any filters or lens attachments you might be using, and because
you’re looking at your scene from a slightly different vantage point, the
cropping you see in your viewfinder might be slightly different from what the
camera actually shoots (this problem is referred to as 2).
When you look through the viewfinder on an SLR, you’re actually looking through
the same lens that is used to expose the image sensor. As in a film camera, the
image sensor in a digital camera sits on the focal plane, a flat area directly behind
the lens. In front of the sensor is the shutter, a mechanical curtain that opens
and closes very quickly when you press the shutter button. The shutter lets you
control how long the sensor gets exposed to light. Obviously, because there’s an
image sensor and a shutter sitting directly behind the lens, you can’t easily get a
clear view through the lens without some work, with the shutter and image sensor
in the way.

Take a look at the profile of your camera and note that the lens is actually sitting
much lower than the viewfinder. If you could take a cross section of your camera,
you would see that the image sensor and shutter are directly behind the lens. In
front of the shutter sits a mirror set at a 45° angle. This mirror bounces the light
from the lens up into a complex optical arrangement called a pentamirror, an array
of mirrors that bounces the light back out through the viewfinder. Thanks to
this system of mirrors, you can see out the lens. Of course, since the mirror sits
between the lens and the focal plane, there’s no way that the image sensor can
see out the lens. This is where the reflex part of “SLR” comes to play.
When you press the camera’s shutter button, the camera flips the mirror up so
that it’s completely out of the way of the focal plane. Then the shutter is opened,
the sensor is exposed, the shutter closes, and then the mirror comes back down.
Part of the distinctive sound of shooting with an SLR is the sound of the mirror
going up and down.
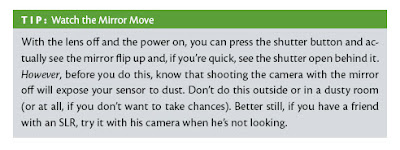
You can actually see the mirror itself any time you take the lens off your camera. It
sits inside the mirror chamber. If you look toward the top of the mirror chamber,
you can see where the light gets bounced up into the pentamirror.
SLRs have many advantages over point-and-shoot cameras, and the fact that you
and the sensor look through a single lens is a very big one. It means that what you
see through the viewfinder is much more accurate than what you typically find
with the optical viewfinder on a point-and-shoot camera. Also, because they’re
larger than point-and-shoot viewfinders, SLR viewfinders are usually much
brighter, clearer, and easier to see.
Of course, on a point-and-shoot camera, when you use the LCD screen as a viewfinder,
you’re looking through the same lens as the sensor. But the optical viewfinder
on an SLR still offers advantages. They’re visible in bright daylight, and as
you’ll see, present you with a view of more of the colors and tones in your image.

Finally, many photographers prefer SLR viewfinders because they like to block
out the rest of the world with the camera so that they can fully concentrate on
the image in the viewfinder. This is much harder to do with the inferior viewfinder
or LCD viewfinder on a point-and-shoot camera.


[get this widget]
In the previous post you saw how you can use the Rebel T1i’s
automatic features for easy snapshot shooting. Before we go on to
learn about its more advanced shooting features, we’re going to
take a tour of the camera and learn its parts. The T1i is a complex
tool, and the better you know its workings, the more easily and
effectively you’ll be able to make it do what you want.
What Is an SLR Anyway?
The Rebel T1i is an SLR camera, a term you may have come across when you were
shopping. SLR stands for single lens reflex, and those words tell you some important
things about how the camera operates.
As the name implies, a single lens reflex camera has only one lens on it. If you’re
wondering why a camera might have two lenses, consider a point-and-shoot
camera. On the front of a lot of point-and-shoot cameras, you’ll see two lenses,
one that is used to expose the image sensor and a separate lens that serves as a
viewfinder. Because it’s very simple to engineer and doesn’t take up much space,
a point-and-shoot camera can be made very small.

The downside to this setup is that when you look through the viewfinder, you’re
not necessarily seeing the same thing the camera’s image sensor sees. You’re not
seeing the effects of any filters or lens attachments you might be using, and because
you’re looking at your scene from a slightly different vantage point, the
cropping you see in your viewfinder might be slightly different from what the
camera actually shoots (this problem is referred to as 2).
When you look through the viewfinder on an SLR, you’re actually looking through
the same lens that is used to expose the image sensor. As in a film camera, the
image sensor in a digital camera sits on the focal plane, a flat area directly behind
the lens. In front of the sensor is the shutter, a mechanical curtain that opens
and closes very quickly when you press the shutter button. The shutter lets you
control how long the sensor gets exposed to light. Obviously, because there’s an
image sensor and a shutter sitting directly behind the lens, you can’t easily get a
clear view through the lens without some work, with the shutter and image sensor
in the way.

Take a look at the profile of your camera and note that the lens is actually sitting
much lower than the viewfinder. If you could take a cross section of your camera,
you would see that the image sensor and shutter are directly behind the lens. In
front of the shutter sits a mirror set at a 45° angle. This mirror bounces the light
from the lens up into a complex optical arrangement called a pentamirror, an array
of mirrors that bounces the light back out through the viewfinder. Thanks to
this system of mirrors, you can see out the lens. Of course, since the mirror sits
between the lens and the focal plane, there’s no way that the image sensor can
see out the lens. This is where the reflex part of “SLR” comes to play.
When you press the camera’s shutter button, the camera flips the mirror up so
that it’s completely out of the way of the focal plane. Then the shutter is opened,
the sensor is exposed, the shutter closes, and then the mirror comes back down.
Part of the distinctive sound of shooting with an SLR is the sound of the mirror
going up and down.
You can actually see the mirror itself any time you take the lens off your camera. It
sits inside the mirror chamber. If you look toward the top of the mirror chamber,
you can see where the light gets bounced up into the pentamirror.
SLRs have many advantages over point-and-shoot cameras, and the fact that you
and the sensor look through a single lens is a very big one. It means that what you
see through the viewfinder is much more accurate than what you typically find
with the optical viewfinder on a point-and-shoot camera. Also, because they’re
larger than point-and-shoot viewfinders, SLR viewfinders are usually much
brighter, clearer, and easier to see.
Of course, on a point-and-shoot camera, when you use the LCD screen as a viewfinder,
you’re looking through the same lens as the sensor. But the optical viewfinder
on an SLR still offers advantages. They’re visible in bright daylight, and as
you’ll see, present you with a view of more of the colors and tones in your image.

Finally, many photographers prefer SLR viewfinders because they like to block
out the rest of the world with the camera so that they can fully concentrate on
the image in the viewfinder. This is much harder to do with the inferior viewfinder
or LCD viewfinder on a point-and-shoot camera.

[get this widget]
Powered by Blogger Tutorials
Cover Your Shot, or “One Shot Is Rarely Enough”
Monday, October 26, 2009
Cover Your Shot, or “One Shot Is Rarely Enough”
There’s one mistake that all beginning photographers make: they think an expert
photographer sees a scene or subject, determines how to best frame and expose
it, and then takes a picture of it. If you describe this process to an “expert” or
“professional” photographer, they’ll most likely laugh.
The fact is, even the most accomplished photographer rarely gets it right the first
time and so rarely shoots only one exposure of a subject. Instead, they work their
subject—something we’ll be talking about a lot through the rest of this book.
Very often, the only way to find the best composition or angle on a shot is to
move around. Get closer and farther, stand on your tiptoes, squat down low,
circle the object—and look through the viewfinder the whole time, and shoot
the whole time.
If you like, review your shots and try again. Often, photography is like sculpture.
You can’t see the finished shot right away. Instead, you have to “sculpt” the scene,
trying different vantage points until you find the angle that makes for the most
interesting composition and play of light, shadow, and color.

[get this widget]
Powered by Blogger Tutorials
Snapshot shooting tips for your canon t1i or eos 500D
Saturday, October 17, 2009
Don’t Be Afraid to Get in Close
Another portrait tip: you don’t have to show a person’s entire face or head. Don’t
be afraid to crop them and get in close for a very personal shot.

You can get close either by standing physically close to the person or by standing
farther away and zooming in. However, as you’ll see in Chapter 6, these two
options produce very different images, so you’ll want to think about which approach
is right for your subject.
Remember That Your Knees Can Bend
It’s easy to forget about that third dimension that you can move in, and shoot all
of your shots while standing up. Don’t forget that you can bend your knees (or
even lie on the ground) to get a different angle. Getting down low is especially important
when shooting children and animals, since it puts you at a more personal,
eye-to-eye relationship with them.

Lead Your Subject
When shooting a portrait of someone who’s looking off-frame, consider leading
the subject. When someone is looking out of the frame, we’re more interested in
the space that’s in front of them than the space that’s behind them. Even if we can’t
see what it is they’re looking at, we still want to feel the extra space that sits in the
direction they’re looking.

Watch the Background
Don’t pay attention just to your subject; remember that they’re also standing
in front of something. Make sure there’s nothing “sticking out” of their head or
juxtaposed in a distracting way.

Watch Out for Backlighting
This is loosely related to the previous tip. Be careful about shooting your subject
in front of a brightly lit background, such as a window, or shooting into
the sun. Although sometimes you can use such an approach to great effect, for
simple snapshots you’ll get better results keeping a close eye on the backlight in
your shots. If you find yourself shooting someone in front of a window or bright
light, try to move them or yourself so that the light is not directly behind them.
The problem with bright lights in the background of a shot is that they confuse
the camera’s light meter. When a bright light appears in the background, the
camera meters to properly expose that bright light. This usually means the foreground
is left underexposed and appears too dark.
In Full Auto mode, the Rebel T1i should recognize such a situation and automatically
pop up the flash. The flash will serve to light up the foreground, creating a
more even exposure with the background.
You’ll learn more about metering, as well as other strategies for handling backlighting,
in Chapter 7. For now, even if you aren’t sure exactly how to handle such
a situation, at least start learning to recognize when you’re shooting in this type
of difficult lighting condition.

Understand Flash Range
While the flash on the T1i can do a good job of illuminating a subject, you have
to remember that it has a limited range. Anything beyond about 13 feet from the
camera will fall out of the flash’s range and not be illuminated at all. So, if you’re
standing at night across the street from a person or building and you shoot a picture
with the flash popped up, you’ll probably get a shot that’s completely black.
For this situation, flash is not the answer. Instead, you’ll need to employ some
low-light shooting strategies, which we’ll discuss in Chapter 7.
Cover Your Shot, or “One Shot Is Rarely Enough”
There’s one mistake that all beginning photographers make: they think an expert
photographer sees a scene or subject, determines how to best frame and expose
it, and then takes a picture of it. If you describe this process to an “expert” or
“professional” photographer, they’ll most likely laugh.
The fact is, even the most accomplished photographer rarely gets it right the first
time and so rarely shoots only one exposure of a subject. Instead, they work their
subject—something we’ll be talking about a lot through the rest of this book.
Very often, the only way to find the best composition or angle on a shot is to
move around. Get closer and farther, stand on your tiptoes, squat down low,
circle the object—and look through the viewfinder the whole time, and shoot
the whole time.
If you like, review your shots and try again. Often, photography is like sculpture.
You can’t see the finished shot right away. Instead, you have to “sculpt” the scene,
trying different vantage points until you find the angle that makes for the most
interesting composition and play of light, shadow, and color.
[get this widget]
Powered by Blogger Tutorials
Best Canon eos 500D HD video Converter
Monday, October 12, 2009
 Are you looking for an HD video converter for all your beautiful HD videos from canon eos 500D, then i must recomend you this software, i have been using this for almost 5 months and i am satisfied with this product, it converts all the HD videos from t1i and gives better HD images. fast and easy to convert HD videos from canon eos 500D
Equipped with advanced High-Definition (HD) video conversion technology, Xilisoft HD Video Converter can easily convert HD video formats such as AVCHD (mts, m2ts), H.264/AVC, MKV, MPEG-2 (ts), DivX, HD WMV, MPEG-4 and Quick Time. Sit back and let Xilisoft HD Converter do the job for you, convert from HD videos to Standard-Definition (SD), or even upgrade an SD video to HD!
Besides converting among HD video formats, the Video Converter can also extract and convert audio files, capture pictures from various videos, make videos out of pictures with JPG, GIF, BMP or PNG extensions and even set the output file size.
- Supports HD videos such as AVCHD (mts, m2ts), TS, H.264/AVC, MKV
- Create videos and SWF/FLV file from pictures
- Convert popular formats like AVI, MPEG, WMV, MP4, DivX, RM, MOV, and FLV
- Convert HD to SD videos and audios
[get this widget]
Powered by Blogger Tutorials
Canon eos 500d snap shot tips
Snapshot Tips
While the rest of this book is going to cover just about every aspect of shooting
in great detail—from holding the camera to processing images—you can do a lot
with what you’ve already learned about the Full Auto capability. Since the camera
is taking care of most of the technical issues for you, it’s a good time to practice
handling the camera and composing shots.
We’re going to talk about composition in great detail in Chapter 8. For now, consider
the following tips when shooting snapshots.
Watch That Headroom: Fill the Frame
When shooting a portrait or candid snapshot of someone, you usually do not
need a lot of headroom, unless you want to show something about the environment
they’re in.
For example, in the top image on the facing page the extra headroom doesn’t add
anything to the picture. In fact, it’s kind of distracting and takes up space that
could be used to show a larger image of the person. In the bottom image, we fill
the frame with more of the person. We can see a better view of him, but we still
get enough background detail to get an idea of the environment he’s in.
“Fill the frame” is one of the most important compositional rules you can learn,
no matter what type of image you’re shooting. Don’t waste space in the frame.
Empty space in your image is space that could be used to provide a larger, better
view of your subject.

[get this widget]
Powered by Blogger Tutorials
How to use screen modes in canon eos 500d, t1i
Sunday, October 4, 2009
Using Scene Modes
Now you’ve seen how the T1i’s Full Auto mode works. Since Full Auto mode takes
care of all the critical decisions regarding camera settings, it’s an ideal mode for
snapshot shooting and for getting used to the camera. Before you go off shooting,
though, let’s take a quick look at some other auto features that you might find
useful while getting started.
On the Mode dial, you’ll see a bunch of little icons underneath the Full Auto option.
These are the T1i’s scene modes.

These options on the Mode dial are scene modes, which bias the camera’s decisions
under specific conditions so that it calculates more appropriate exposures
Scene modes are also fully automatic, but each one biases some of its decisions in
a certain way to make it more appropriate to particular types of shooting.
Portrait mode
Portrait mode is ideal for shooting—you guessed it!—portraits.
What makes a portrait different from any other type of shot? Typically,
in a portrait you want the background blurred out to bring more attention to
your subject. Portrait mode biases its exposure decisions to attempt to blur
the background.

In the upper image, I shot with deeper depth of field to reveal details in the
background. In the lower image, I shot with shallow depth of field to blur the
background out and bring more focus to the subject.

Landscape mode
Landscape mode can help your landscape shots because
it will choose settings that attempt to maximize the amount of your
scene that will be in focus. It’s basically the opposite of Portrait mode.
Close-up mode
Close-up shots of flowers or small objects (what is traditionally
referred to as macro photography) are made easier with Close-up
mode.
Sports mode
When shooting fast-moving subject matter such as moving
wildlife or a sporting event, opt for Sports mode. Sports mode biases the camera’s
exposure so that fast-moving objects will be sharp and clear.
When using Sports mode, make sure the center focus point is on your subject
when you press the shutter button halfway. Unlike other modes, you won’t
hear a beep when the camera has locked focus. Instead, the camera will begin
beeping continuously to indicate that it is now tracking your subject! Yes,
Sports mode uses the Rebel T1i’s Servo focus feature to track a moving object
and keep it in focus.
Press the shutter to take a shot. If you keep the shutter button held down, the
camera will continue to shoot.
Night Portrait mode
One of the biggest mistakes people make when
shooting with flash is that they assume a flash can light up an entire scene,
just as if it were daylight. But the flash on any camera has a limited range. It’s
usually enough to light up your subject but not your background, leaving you
with a subject that appears to be standing in the middle of a dark limbo.
Disabling Flash
mode Flash photography is not always allowed. Museums,
performances, and other public venues often prohibit flash photography.
Set the mode dial to Disabling Flash mode, and the T1i will never use its
flash.
When shooting without the flash, you may find that some of the numbers inside
the viewfinder blink. When this happens, the camera is informing you that light
is low, so you need to be extra careful to hold the camera steady. Also, be aware
that when the numbers are flashing, there’s a good chance that your resulting
image will be too dark.

At night, if you take a flash picture, you’ll usually end up with a well-exposed
subject on a background of complete black. This is because the range of the flash is
only about 10 feet. Objects beyond that will not be illuminated by the flash.

[get this widget]
Powered by Blogger Tutorials


