
System map for eos 500d or rebel t1i
Friday, November 27, 2009
EOS REBEL T1i / EOS 500D System Map

if you would like to know about the system map details of canon eos 500d or t1i here is the better explanation chart above, it gives all the system map about the new canon eos 500D or the t1i dslr camera.


[get this widget]
Powered by Blogger Tutorials
Difficult Subjects of AF(Auto Focus in Eoa 500D or t1i)
Wednesday, November 25, 2009
AF (Auto Focus) can fail to achieve focus (the focus confirmation light blinks) on certain subjects such as the following:
- Low-contrast subjects. (ex. blue sky, solid-color walls, etc.)
- Subjects in low light.
- Extremely backlit reflective subjects. (ex. car with a reflective body)
- Overlapping near and far objects. (ex. animal in a cage)
- Repetitive patterns. (ex. Skyscraper windows, computer keyboards, etc.)
In such cases, do either of the following:
- Focus on an object at the same distance as the subject and lock the focus before recomposing. Please see NOTE below about "focus".
- Set the lens focus mode switch to
and focus manually.

auto focus in eos 500d or t1i, all the explanations are given for your easy reference, so enjoy
[get this widget]
Powered by Blogger Tutorials
Using the Remote Live View Function in EOS Utility to Shoot Movies Remotely (EOS REBEL T1i/EOS 500D)
Tuesday, November 24, 2009
1. Connect your camera and computer, and then turn the camera's power switch to <>.
- This camera cannot communicate with EOS Utility if the camera's mode dial is set to <
 >. Set the mode dial to a mode other than < >.
 - Please see the Related Information for how to connect the camera to the computer.
2. Set the lens focus mode switch to .

3. Once EOS Utility starts, click [Camera settings/Remote shooting].

4. The capture window appears, so set the settings items for shooting.

5. Set the mode dial to < >.
>.
6. Set the Live View function.
6-1. Click  to display the [Set-up menu], and click [Live View/Movie func. set.] (
  ).
).
to display the [Set-up menu], and click [Live View/Movie func. set.] ( ). 6-2. The [Live View/Movie func. set.] window appears, so set the movie recording size (  ), and then click [OK](
  ).
).
), and then click [OK]( ). 
7. Click the [Remote Live View shooting] button.

8. The [Remote Live View window] appears, so drag the enlargement display frame to move it to the position where you want to focus.

9. Click [ON].
- AF is executed.
- When focus is achieved, the camera makes a beeping sound, image will reappear in the Remote Live View window and the AF point turns green.
- If focus is not achieved, the AF point turns red.

10. When focus is achieved and it becomes ready for shooting, click the [  ] button at the lower left of the [Remote Live View window].
] button at the lower left of the [Remote Live View window]. 
11. Click the [  ] button to start shooting.
] button to start shooting. At the lower left of the [Remote Live View window], a [  ] icon and the recording time are displayed.
] icon and the recording time are displayed.
Click the [ ] button again to end shooting
] button again to end shooting
[get this widget]
Powered by Blogger Tutorials
T1i or canon eos 500d Camera Sides
Camera Sides
The left side of the camera (if you’re looking at it from behind) holds a rubber
door that covers three ports.
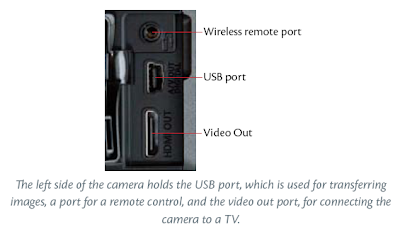
These ports are used for connecting your camera to a TV to play back images, for
connecting a wired remote, and for attaching your camera to a computer. We’ll
look at all of these options in more detail later.
The port cover doesn’t snap closed; instead, you kind of have to mash it into its
receptacle until it stays.
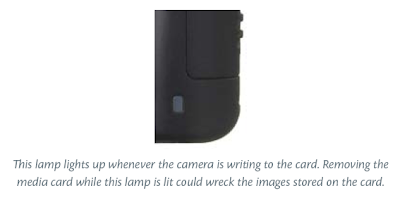
On the right side of the camera is the media slot cover, which you should already
have used when inserting your media card.
Note that just below the media slot cover, on the rear of the camera, there’s a
small light. Any time the camera is reading or writing data, this light will illuminate.
If you open the door when an image is being written, the camera will beep
and post a warning on the screen.

Camera Back
Obviously, it is the back of the camera where the bulk of the controls are housed,
alongside the LCD screen.
Above the LCD screen are the Menu and Display buttons, which are used to control
what is shown on the camera’s LCD screen.
To the right of the screen is a circular array of controls, along with exposure compensation
and and Live View buttons. These are the controls you’ll use in everyday
shooting to change shooting parameters.
In Chapter 1, we covered the diopter control, which allows you to adjust the
viewfinder to compensate for your glasses prescription.
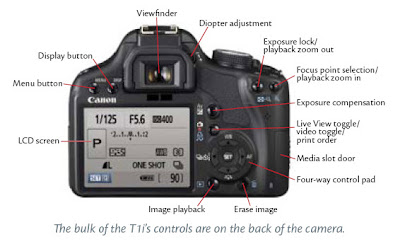
On the upper-right side of the camera are two additional buttons, which are used
to change focus point selection and to control exposure lock.
These controls also have blue magnifying glasses beneath them. Blue icons indicate
playback mode functionality. So, when reviewing your images, these two
buttons turn into zoom in and zoom out controls. (Similarly, the Live View button
does double duty as a Print button.)
Finally, at the bottom of the camera, you’ll find the Play button, which you should
have used already, and the Delete button, which we’ll cover in Chapter 3.
Camera Bottom
The bottom of the camera doesn’t have any controls, but it does have two important
features. There’s the battery compartment, which you’ve already used, and
there’s the tripod mount.
[get this widget]
The left side of the camera (if you’re looking at it from behind) holds a rubber
door that covers three ports.

These ports are used for connecting your camera to a TV to play back images, for
connecting a wired remote, and for attaching your camera to a computer. We’ll
look at all of these options in more detail later.
The port cover doesn’t snap closed; instead, you kind of have to mash it into its
receptacle until it stays.
On the right side of the camera is the media slot cover, which you should already
have used when inserting your media card.
Note that just below the media slot cover, on the rear of the camera, there’s a
small light. Any time the camera is reading or writing data, this light will illuminate.
If you open the door when an image is being written, the camera will beep
and post a warning on the screen.


Camera Back
Obviously, it is the back of the camera where the bulk of the controls are housed,
alongside the LCD screen.
Above the LCD screen are the Menu and Display buttons, which are used to control
what is shown on the camera’s LCD screen.
To the right of the screen is a circular array of controls, along with exposure compensation
and and Live View buttons. These are the controls you’ll use in everyday
shooting to change shooting parameters.
In Chapter 1, we covered the diopter control, which allows you to adjust the
viewfinder to compensate for your glasses prescription.

On the upper-right side of the camera are two additional buttons, which are used
to change focus point selection and to control exposure lock.
These controls also have blue magnifying glasses beneath them. Blue icons indicate
playback mode functionality. So, when reviewing your images, these two
buttons turn into zoom in and zoom out controls. (Similarly, the Live View button
does double duty as a Print button.)
Finally, at the bottom of the camera, you’ll find the Play button, which you should
have used already, and the Delete button, which we’ll cover in Chapter 3.
Camera Bottom
The bottom of the camera doesn’t have any controls, but it does have two important
features. There’s the battery compartment, which you’ve already used, and
there’s the tripod mount.
[get this widget]
Powered by Blogger Tutorials
Canon eos 500d/t1i body parts
Saturday, November 21, 2009
Body Parts
As you work through the rest of this book, you will become well-versed in all of
the T1i’s controls. Let’s take a quick look at the different interface elements on the
T1i so that you understand what controls I’m referring to as you work through
the rest of the book.
Camera Top
You should already be familiar with the power switch and Mode dial on the top
of the camera. We’ll be exploring all of the mode options throughout the rest of
the book.
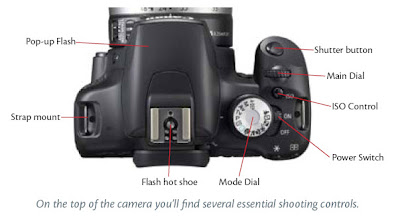
• If you’ve been shooting, then you also already know where the shutter button
is and understand that it has two positions, a half-press position for focusing
and a full press for taking a shot.
• Just behind the shutter button is a Control Wheel. You’ll use this for changing
parameters such as aperture and shutter speed.
• Behind the Control Wheel is the ISO button, which is used for setting the ISO
speed of the camera. You’ll learn about this in Chapter 6.
• Finally, just above the viewfinder is a hotshoe for mounting an external flash
unit.
Camera Front
The front of the T1i has minimal controls, but the few buttons that are there are
ones you’ll use often.
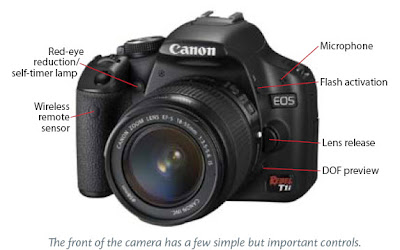
• The Flash button pops up the camera’s internal flash. In Full Auto mode, the
flash pops up automatically whenever the camera thinks you need it. In most
other modes, you decide when to use the flash and press this button to activate
it.
• Note the position of the microphone, which is used during video recording.
You’ll want to be very careful not to cover this with your fingers while
shooting.
• You’ll press the lens release button any time you want to remove the lens
from your camera. Press and hold the button while twisting the lens
counter-clockwise.
• The depth-of-field preview button is used to get an idea of how much of your
image will be in focus. We’ll explore it in Chapter 7.
• On the front left of the camera is a sensor for Canon’s optional RC-1, RC5 wireless
remote (or a compatible third-party remote). The camera communicates
with the remote through the sensor on the front of the hand grip. In addition
to wireless remotes, the T1i is also compatible with Canon’s RS-60E3 wired
remote.
• The red-eye reduction/self-timer lamp serves two purposes. When shooting
with the flash in red-eye reduction mode, this lamp flashes to try to reduce
red eye. When shooting with the self-timer, the lamp flashes to indicate that
the camera is counting down to firing.

[get this widget]
Powered by Blogger Tutorials
The Media Card for canon eos 500D/t1i
Sunday, November 15, 2009

The Media Card for t1i or canon eos 500D
As you already know, your Rebel T1i uses a Secure Digital (SD) card. The T1i is also
compatible with SDHC, a newer format that has the same form factor as SD but
comes in higher capacities and offers speedier transfer. Note that you’ll need an
SDHC reader for SDHC cards. Fortunately, an SDHC reader will read normal SD
cards, so you need only one reader to read both formats.
When shopping for media cards, you’ll find a wide range of capacities and vendors
and a correspondingly wide range of prices. What’s the difference between
a 2 GB card that costs $19 and one that costs $49? Nothing at all, in terms of the
number of images it will hold. However, that $49 card is probably much faster,
which means your camera will be able to dump images to it more quickly.
As you already learned, the number on the right side of the viewfinder status display
shows how many images the camera can currently fit in its internal buffer. As
you shoot, the buffer fills, and the number goes down. It takes time for the camera
to dump these images to the card, and while the camera is performing this transfer,
you may not be able to shoot at all or to shoot a full burst of images. So, with
a speedier card, the camera will be able to dump its images more quickly, freeing
up buffer space for more shots. How much this will matter to you depends on the
type of shooting you do. If you plan on shooting sports or other action shots, where
you’ll typically be shooting bursts, then you will want a speedier card.
Another way to look at it is that if you want to ensure the best chance that the
camera will always be able to shoot, then get a speedier card. A 133x card (or faster)
will deliver a very good level of performance in the T1i. If you find that those
cards cost more than you’d like to spend, then go for something less expensive,
but understand that sometimes the camera might be tied up with storing images
and so won’t be able to shoot.
The T1i has some additional media considerations, though, because of its ability
to shoot video. While a video frame doesn’t use the camera’s full resolution,
cranking out dozens of them per second requires a speedy card. In general, if
you’re planning on shooting video, you should get a Class 6 SDHC card.

[get this widget]
Powered by Blogger Tutorials
The T1i /eos 500d Battery
Saturday, November 7, 2009

The T1i/canon eos 500d Battery
Your camera requires a battery to power its onboard computer, light meter, image
sensor, and other components. If you were following along in the previous
chapter, then you’ve already charged and used the battery, so we’re going to cover
some battery tips here:
• With a new battery, you should find that you can get about 500 shots off of a
single charge. As the battery ages, this number will go down, but the included
battery should be good for a couple of years of shooting before you need to
replace it.
• Note that, in general, you do not need to worry about completely draining the
battery before recharging it. You can “top it off” at any time without harming
the battery itself.
• However, for the first few charges, drain the battery completely and then give
it a full charge. After that, you can “top it off” anytime you like.
The T1i and bad weather
While the Rebel T1i can handle light rain, it’s not going to do so well in heavy
rain, or submersed in water. If you accidentally submerge your camera, take it
out of the water immediately and don’t turn it on. Remove the battery and media
card and let the camera sit for several days to dry out. To speed drying, place
the camera in a bowl and cover it with dry, uncooked rice. The rice will act as a
desiccant and can help speed drying.
After a few days, try powering up the camera. If it works—and the viewfinder isn’t
too dirty—then there’s no reason not to start shooting. If it doesn’t work, then
you’ll need to send the camera in to Canon. You can find instructions for getting
your T1i reparied at Canon’s website, www.canon.com. From the repair page, you
can easily set up a mail-in repair request. My experience with Canon’s service center
is that it’s very speedy, so you shouldn’t be without your camera for very long.
If you’re shooting in extreme heat or cold, be aware that the LCD screen on the
back of the camera may not work. Canon officially rates the operating temperature
of the T1i as 32 to 104°F (0 to 40°C). You can probably go a little beyond
these temperatures, but if you do, you will be risking a hardware failure. At extreme
temperatures, small parts and circuits expand and contract and can break.
If you’re shooting in very cold, damp weather, you must be careful when returning
indoors, because condensation inside the camera can cause the lens or
viewfinder to fog. When shooting in cold, take a Ziplock bag with you. Before
you return to a heated room, turn off the camera and place it in the bag. Zip up
the bag and leave it zipped until the camera has had time to warm up. Once the
temperature inside the bag has equalized with the temperature outside, you can
open the bag without fear of condensation.
• If you plan on an extended trip away from power, or if you tend to shoot a lot,
then you might want to invest in another battery. For less than $100, you can
get a second battery and charge it up before you leave. You can easily swap
out the battery as needed.
• You might also consider some alternate chargers, such as a charger that can
work off a car cigarette lighter or a small, inexpensive solar charger, which will
provide you with a way to charge your camera battery (as well as a cell phone
or iPod) any time you have access to sunlight.

[get this widget]
Powered by Blogger Tutorials
Cleaning and Maintenance of canon eos 500d/rebel t1i/kissx3

Cleaning and Maintenance
At a fundamental level, all cameras are the same: a lens focuses light onto a recording
medium. Because the recording medium is light-sensitive, it must be kept
in a lightproof box. A shutter in front of the recording medium allows for control
of when the sensor is exposed and how long the exposure will last. Cameras have
worked this way since the beginning of photography in the 1850s, and while all
sorts of new technologies have come along—
everything from light meters to stabilized
lenses to self-timers, color film, and autofocus—the basic principles of a
lens that focuses light onto a light-sensitive medium held in a lightproof box have
remained the same.
Of course, the significant change in a digital camera is the recording medium
that’s being exposed. Rather than a piece of celluloid covered with light-sensitive
chemicals, a digital camera employs a silicon chip covered with light-sensitive bits
of metal. And, where a film camera needs a bunch of mechanics to move the film
in and out of the roll, a digital camera needs an onboard computer and storage
device to process and store the images that it captures.
Other than this change, though, your Rebel T1i is similar in design to a traditional
35mm SLR. The camera body is the lightproof box that houses the image sensor,
shutter, and viewfinder. Of course, it also has lots of other things, like the shutter
button, controls, LCD screen, battery, media card, tripod mount, pop-up flash,
and more.
The Rebel T1i is not weatherproof, meaning that Canon has not engineered it
for handling harsh environments. The various openings on the camera—the
lens mount and assorted doors—are not sealed against sand and moisture. So, if
you’re planning an extended stay in the Sahara or a float trip down the Amazon,
you might want to think about taking a sturdier camera. That said, there’s no
reason you can’t go shooting with the camera in drizzle or light rain. A little water
on the body won’t hurt anything; just wipe off the camera and keep shooting.
[get this widget]
Powered by Blogger Tutorials


