
Auto Practice with Canon eos 500D/t1i
Monday, December 28, 2009
More Full Auto Practice
In this chapter, we’ve covered a lot of technical and practical details that are essential
to understand if you want to be able to use your camera quickly and effectively.
Often, quick use of the camera is what makes the difference between
capturing a “decisive moment” and getting a boring shot.
In the next chapter, we’re going to start getting more technical about basic photographic
theory, but before we go there, you might want to take some time to
do a little more practice in Full Auto mode. Shooting in Full Auto does not mean
you’re a photo wimp. The canon eos 500D in Full Auto mode is a very powerful instrument,
and having the camera decide technical details for you can free you up
to focus on composition and content. We’ll be discussing composition in more
detail in Chapter 8, but here are some exercises to try right now, before moving
on to the next chapter.
Work with Fixed Focal Length
Zoom lenses can make you lazy. They tend to encourage you to stay in one place
and compose from there. As we’ll see later, there can be a great difference in images
shot from different locations. But zoom lenses also keep you from having to
visualize a scene for a particular framing. Here are three quick exercises that will
get you seeing and thinking in a different way:
Full wide Zoom your lens out to full wide and leave it there! Spend a few
hours shooting with it at full wide. Don’t zoom the lens. Instead, reposition
yourself if you need to frame the shot differently. Be aware that you may not
be able to visualize or recognize potential scenes when limited to this one focal
length. So, if you think you see something even remotely interesting, look
at it through the camera. You don’t have to shoot it, but often when you look
through the camera, you’ll see a potential shot that you didn’t recognize when
you were looking with the naked eye.
Full tele Now do the same thing as the previous exercise, but this time zoom
your lens to its longest focal length. In other words, zoom in all the way. Spend
some time shooting as before. No zooming!
30mm On the canon eos 500D, a 30mm lens has the same field of view as a 50mm
lens on a 35mm camera. This also happens to be roughly the same field of
view as your eye. Consequently, a 50mm equivalent lens is considered a “normal”
lens. Some of the most famous, celebrated photos of all time have been
shot with a 50mm lens. The great French photographer Henri Cartier-Bresson
worked exclusively with a 50. If it’s good enough for him, the rest of us should
be able to manage.
Set your camera on 30mm and spend a few hours shooting. Again, don’t
zoom! Some Canon lenses show a dot on the zoom ring to indicate where
normal is.
Obviously, with prime lenses—that is, lenses that don’t zoom—you get this type
of shooting experience all the time. These exercises are a way for you to learn
some of the advantages (and disadvantages) of shooting with a fixed focal length
lens.


[get this widget]
In this chapter, we’ve covered a lot of technical and practical details that are essential
to understand if you want to be able to use your camera quickly and effectively.
Often, quick use of the camera is what makes the difference between
capturing a “decisive moment” and getting a boring shot.
In the next chapter, we’re going to start getting more technical about basic photographic
theory, but before we go there, you might want to take some time to
do a little more practice in Full Auto mode. Shooting in Full Auto does not mean
you’re a photo wimp. The canon eos 500D in Full Auto mode is a very powerful instrument,
and having the camera decide technical details for you can free you up
to focus on composition and content. We’ll be discussing composition in more
detail in Chapter 8, but here are some exercises to try right now, before moving
on to the next chapter.
Work with Fixed Focal Length
Zoom lenses can make you lazy. They tend to encourage you to stay in one place
and compose from there. As we’ll see later, there can be a great difference in images
shot from different locations. But zoom lenses also keep you from having to
visualize a scene for a particular framing. Here are three quick exercises that will
get you seeing and thinking in a different way:
Full wide Zoom your lens out to full wide and leave it there! Spend a few
hours shooting with it at full wide. Don’t zoom the lens. Instead, reposition
yourself if you need to frame the shot differently. Be aware that you may not
be able to visualize or recognize potential scenes when limited to this one focal
length. So, if you think you see something even remotely interesting, look
at it through the camera. You don’t have to shoot it, but often when you look
through the camera, you’ll see a potential shot that you didn’t recognize when
you were looking with the naked eye.
Full tele Now do the same thing as the previous exercise, but this time zoom
your lens to its longest focal length. In other words, zoom in all the way. Spend
some time shooting as before. No zooming!
30mm On the canon eos 500D, a 30mm lens has the same field of view as a 50mm
lens on a 35mm camera. This also happens to be roughly the same field of
view as your eye. Consequently, a 50mm equivalent lens is considered a “normal”
lens. Some of the most famous, celebrated photos of all time have been
shot with a 50mm lens. The great French photographer Henri Cartier-Bresson
worked exclusively with a 50. If it’s good enough for him, the rest of us should
be able to manage.
Set your camera on 30mm and spend a few hours shooting. Again, don’t
zoom! Some Canon lenses show a dot on the zoom ring to indicate where
normal is.
Obviously, with prime lenses—that is, lenses that don’t zoom—you get this type
of shooting experience all the time. These exercises are a way for you to learn
some of the advantages (and disadvantages) of shooting with a fixed focal length
lens.
[get this widget]
Powered by Blogger Tutorials
35mm Equivalency EOS 500D/T1i
Saturday, December 26, 2009
35mm Equivalency
If you’re coming from a 35mm film camera background, then you might already
have certain ideas about focal length. For example, you probably think of a
50mm lens as a “normal” lens, that is, a lens with a field of view that’s roughly
equivalent to the human eye.
In turn, you probably think of anything longer than 50mm as being telephoto
and anything shorter as being wide-angle. To you, a 16mm lens is probably a
super-wide angle, while a 400mm is a long telephoto.
The image sensor in the Rebel T1i is smaller than a piece of 35mm film. All lenses
project a circular image onto the focal plane, and a rectangular crop is taken
from that to create the final image. But because its sensor is smaller, the T1i cuts
a smaller crop out of that circle.

In practical terms, this means that, for any given focal length, the field of view of a lens
on the canon eos 500D will be narrower than that same focal length on a 35mm camera.
To put it another way, on the Rebel T1i, a 50mm lens has the same field of view
as an 80mm lens on a 35mm film camera.
To calculate the 35mm equivalency of any lens you put on the T1i, simply multiply
the focal length of your lens by 1.6. So, if you have an 18–55 mm lens—a lens
that would be an ultrawide to normal lens on a 35mm film camera—you can
think of it as a 28.8 to 88mm lens in 35mm terms.
Another way of thinking about magnification is to pay attention to the field of
view. In the figure on the previous page, the center image has a much narrower
field of view than the left image. As focal length increases, the field of view captured—
that is, the distance from left to right—gets narrower.
On lenses, the “thickness,” or length of a lens, is measured in millimeters and is
referred to as the lens focal length. A longer focal length means a more telephoto
lens, which means more magnification and less field of view. So, a 300mm lens will
be more telephoto than an 80mm lens. We’ll be speaking about focal length a lot
in my coming article
[get this widget]
Powered by Blogger Tutorials
Tips to make your canon eos 500d battery long life
Wednesday, December 23, 2009
Here's something I learned that gained me a noticeably longer battery life between charges: Turn off the setting that automatically turns on the LCD screen for a couple seconds immediately after you take a picture. In my opinion, this feature is useless and a drain on the battery. If I want to see a picture directly after I take a shot, two seconds isn't long enough and I would end up turning on the LCD screen again anyway. Now, if I turn off that setting and only turn on the LCD when I push the "play" button, the total time the LCD is turned on is almost cut in half. It sounds like it wouldn't make much difference, but you'll notice it if you've been leaving that two second setting on.
[get this widget]
[get this widget]
Powered by Blogger Tutorials
The Lens of canon eos 500D or T1i
The Lens
One of the great things about an SLR like the EOS 500D is that you can remove the
lens and replace it with another. Interchangeable lenses allow you to build a lens
collection tailored to the way you like to shoot. For example, if you’re a nature
shooter who likes a long reach, you can invest in telephoto lenses; if you’re a landscape
shooter, you might want to weight your collection toward wide-angle lenses.
Because you can remove the lens, you can choose to upgrade lenses later and
improve the quality of your images without having to replace the entire camera.
Removable lenses also give you the option to add specialty lenses, such as fisheye
lenses for creating stylized pictures or tilt/shift lenses for architectural work.
Depending on the configuration you purchased, your Rebel T1i may or may not
have come with a lens. If you bought the Rebel T1i kit, you probably have an 18–
55mm zoom lens or an 18–200mm. You should already be practiced at mounting
and unmounting a lens, as detailed on pages 33–34 of your Rebel T1i manual.
Ideally, you want to leave the camera body open for as little time as possible. As
you learned in the previous section, just inside the body is the mirror that reflects
light up into the viewfinder, and behind that is the shutter and image sensor. You
don’t want to get dust or dirt on the image sensor, because any type of debris on
the sensor will show up on your images as dark splotches. The less time you leave
the camera body open, the less chance dust will get inside.
If you have more than one lens, you’ll find that, over time, you will work out a
coordination that allows you to remove one lens, hold it, and get the other lens
on with minimal exposure of the camera body. Obviously, you have to be careful
not to drop anything. Keeping the camera around your neck with the included
strap will free up your hands enough to manage a lens change.

Understanding Focal Length
If you wear glasses, you are probably already familiar with the idea that a thicker
lens provides more magnification. The same is true for your camera lenses—a
longer lens provides more magnification.

[get this widget]
Powered by Blogger Tutorials
Holding canon eos 500D or t1i
Sunday, December 13, 2009
Holding the Camera
Holding the T1i/canon eos 500D might seem like a fairly obvious procedure, but good photographic
“form” can mean the difference between a sharp image and one that’s
blurred from camera shake. Observing a few simple guidelines about camera grip
and posture will improve your chances of getting stable, sharp images.
The Grip
Obviously, your right hand goes around the camera’s grip, with your forefinger
positioned on the shutter button. To guarantee the most stable hold, your left
hand should go underneath the lens barrel, where it connects to the T1i/canon eos 500D.
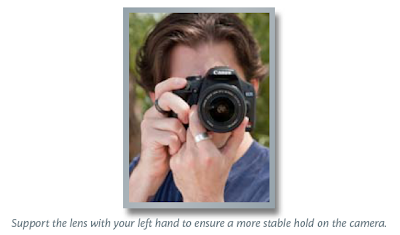
Cradling the T1i/canon eos 500D this way makes it easier to hold the camera for long periods
of time and will help you hold the camera steady. With your forefinger on the
shutter release, you should be able to easily reach the control buttons on the back
of the camera with your thumb.
Feet, Elbows, and Neck
When standing, your most solid, secure stance is to have both feet firmly planted
on the ground, about shoulder-width apart. Obviously, depending on the terrain,
this may or may not be possible. The best way to ensure a stable hold is to always
remember to keep your elbows touching your sides.
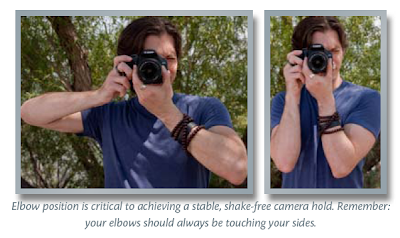
“Elbows in” gives you a very sturdy platform for holding the T1i/canon eos 500D. If you get in
the habit of keeping your elbows against your side, eventually it will simply feel
wrong to not have them pressed against you when shooting. In most cases, even
if you’re on uneven terrain and have to change your foot position, you can still
keep your elbows at your side. Elbows in also holds true when you’re seated.
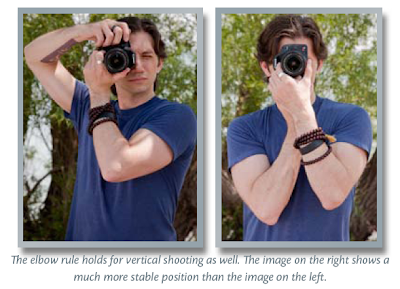
When switching from landscape to portrait orientation, you still want to keep
your elbows at your side to ensure a more stable position.
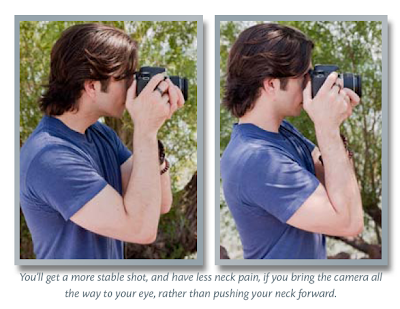
Finally, lift the T1i/canon eos 500D all the way to your face. This may sound strange because
you probably think you are, but many people lift the camera partway to their face
and then push their neck forward to close the gap. In addition to giving you bad
posture (and probably contributing as much to back pain after a day’s shooting as
that heavy camera bag on your shoulder), it’s a much less stable position.
[get this widget]
Holding the T1i/canon eos 500D might seem like a fairly obvious procedure, but good photographic
“form” can mean the difference between a sharp image and one that’s
blurred from camera shake. Observing a few simple guidelines about camera grip
and posture will improve your chances of getting stable, sharp images.
The Grip
Obviously, your right hand goes around the camera’s grip, with your forefinger
positioned on the shutter button. To guarantee the most stable hold, your left
hand should go underneath the lens barrel, where it connects to the T1i/canon eos 500D.

Cradling the T1i/canon eos 500D this way makes it easier to hold the camera for long periods
of time and will help you hold the camera steady. With your forefinger on the
shutter release, you should be able to easily reach the control buttons on the back
of the camera with your thumb.
Feet, Elbows, and Neck
When standing, your most solid, secure stance is to have both feet firmly planted
on the ground, about shoulder-width apart. Obviously, depending on the terrain,
this may or may not be possible. The best way to ensure a stable hold is to always
remember to keep your elbows touching your sides.

“Elbows in” gives you a very sturdy platform for holding the T1i/canon eos 500D. If you get in
the habit of keeping your elbows against your side, eventually it will simply feel
wrong to not have them pressed against you when shooting. In most cases, even
if you’re on uneven terrain and have to change your foot position, you can still
keep your elbows at your side. Elbows in also holds true when you’re seated.
When switching from landscape to portrait orientation, you still want to keep
your elbows at your side to ensure a more stable position.

Finally, lift the T1i/canon eos 500D all the way to your face. This may sound strange because
you probably think you are, but many people lift the camera partway to their face
and then push their neck forward to close the gap. In addition to giving you bad
posture (and probably contributing as much to back pain after a day’s shooting as
that heavy camera bag on your shoulder), it’s a much less stable position.

[get this widget]
Powered by Blogger Tutorials
Camera Status of canon eos 500d/t1i
Camera Status of canon eos 500D or t1i
With the menu active, you can press the Disp button on the back of the camera
to get a view of some important camera statistics.

There’s nothing on this screen that you can’t learn by going and looking at the settings
of the individual parameters, but it can be a nice way to quickly get a look at
some vital settings. You’ll learn more about each of these settings later.
[get this widget]
Powered by Blogger Tutorials
MANUAL APERTURE CONTROL in T1i (T1i video)
Tuesday, December 8, 2009
MANUAL APERTURE CONTROL in T1i (T1i video)
How to manually control the aperture in the canon eos 500d, with canon 50mm 1.8 lens, this technique is really working,please do watch the video, its clearly mentioned how to do to control manual aperture in t1i
[get this widget]
How to manually control the aperture in the canon eos 500d, with canon 50mm 1.8 lens, this technique is really working,please do watch the video, its clearly mentioned how to do to control manual aperture in t1i
[get this widget]
Powered by Blogger Tutorials
The Rebel T1i/canon eos 500D Menu System
Sunday, December 6, 2009
The Rebel T1i/canon eos 500D Menu System
Many of the Rebel T1i’s features are accessed through the camera’s menu system.
When shooting in a rapidly changing environment, such as a sporting event, busy
street, or birthday party, you’ll want to be able to quickly change camera settings,
so it’s important to be able to use the camera’s menus speedily and efficiently.
Fortunately, the T1i has a very good menu layout, so with just a little practice, you
should find that you can get to any option you want very quickly.
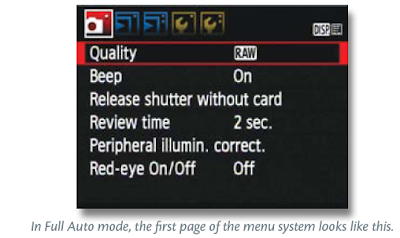
The contents of the menus change depending on what mode you’re in. In Full
Auto mode, the menus contain a smaller subset of the camera’s full menuing options.
In the other modes, you’ll find a complete selection of items.
In this section, we’re going to look at menu navigation so that you’ll know how
to go to a particular menu item—
something you’ll be doing a lot of throughout
the rest of this book.
For the sake of this example, change the camera’s mode to P so that you can see
the full assortment of T1i/canon eos 500D menus.
To activate the menu, press the Menu button on the back of the camera. You can
do this whether you’re currently shooting or viewing images.
In Program mode, the T1i/canon eos 500D displays eight different menus, and the most recently
visited menu is always the one that is currently active when you enter the menu
system.
Each menu is represented by a tab at the top of the screen. The current menu is
brightly lit, and bounded by a white box, while the others are slightly faded. Each
menu contains a different set of options, but no menu contains more options
than can fit on one screen, so you don’t ever have to worry about scrolling up and
down to find a menu item.
When the menu is activated, the four semicircular buttons on the back of the
camera function as arrow keys.
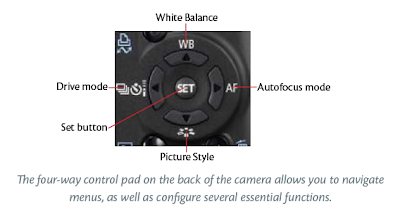
To change from one menu to another, use the left and right arrow keys. To select
an item in the menu, use the up and down arrow keys.

The menus are grouped by function. The first two menus contain shooting functions,
and so they sport camera icons on their tabs. The next two contain playback
functions.
The next three menus are tool menus. They contain various utility functions, such
as setting date and time, formatting your media card, and other options. I’ll be
referring to these menus as “tool menu 1,” “tool menu 2,” or “tool menu 3.”
Finally, there is a custom menu called My Menu, where you can define your own
custom set of options. We’ll explore this menu in Chapter 12.
Once you’ve selected the menu item that you want to access, press the Set button.
What happens next will depend on the feature you’ve chosen, which we’ll be
covering throughout this book.
So, if I tell you to access the Auto Rotate feature in tool menu 1, you’d press
the Menu button to activate the menu, then use the left or right arrow key to
navigate to the first tool menu, use the down arrow key to select Auto Rotate,
and then press the Set button to execute the feature. In the case of Auto Rotate,
a submenu will appear, which offers three different options. (Note that you can
also use the Main dial to cycle through the menus. This might be speedier for you
than using the buttons.)
[get this widget]
Many of the Rebel T1i’s features are accessed through the camera’s menu system.
When shooting in a rapidly changing environment, such as a sporting event, busy
street, or birthday party, you’ll want to be able to quickly change camera settings,
so it’s important to be able to use the camera’s menus speedily and efficiently.
Fortunately, the T1i has a very good menu layout, so with just a little practice, you
should find that you can get to any option you want very quickly.
The contents of the menus change depending on what mode you’re in. In Full
Auto mode, the menus contain a smaller subset of the camera’s full menuing options.
In the other modes, you’ll find a complete selection of items.

In this section, we’re going to look at menu navigation so that you’ll know how
to go to a particular menu item—
something you’ll be doing a lot of throughout
the rest of this book.
For the sake of this example, change the camera’s mode to P so that you can see
the full assortment of T1i/canon eos 500D menus.
To activate the menu, press the Menu button on the back of the camera. You can
do this whether you’re currently shooting or viewing images.
In Program mode, the T1i/canon eos 500D displays eight different menus, and the most recently
visited menu is always the one that is currently active when you enter the menu
system.
Each menu is represented by a tab at the top of the screen. The current menu is
brightly lit, and bounded by a white box, while the others are slightly faded. Each
menu contains a different set of options, but no menu contains more options
than can fit on one screen, so you don’t ever have to worry about scrolling up and
down to find a menu item.
When the menu is activated, the four semicircular buttons on the back of the
camera function as arrow keys.

To change from one menu to another, use the left and right arrow keys. To select
an item in the menu, use the up and down arrow keys.

The menus are grouped by function. The first two menus contain shooting functions,
and so they sport camera icons on their tabs. The next two contain playback
functions.
The next three menus are tool menus. They contain various utility functions, such
as setting date and time, formatting your media card, and other options. I’ll be
referring to these menus as “tool menu 1,” “tool menu 2,” or “tool menu 3.”
Finally, there is a custom menu called My Menu, where you can define your own
custom set of options. We’ll explore this menu in Chapter 12.
Once you’ve selected the menu item that you want to access, press the Set button.
What happens next will depend on the feature you’ve chosen, which we’ll be
covering throughout this book.
So, if I tell you to access the Auto Rotate feature in tool menu 1, you’d press
the Menu button to activate the menu, then use the left or right arrow key to
navigate to the first tool menu, use the down arrow key to select Auto Rotate,
and then press the Set button to execute the feature. In the case of Auto Rotate,
a submenu will appear, which offers three different options. (Note that you can
also use the Main dial to cycle through the menus. This might be speedier for you
than using the buttons.)

[get this widget]
Powered by Blogger Tutorials
Another creative canon eos 500D/t1i video
Powered by Blogger Tutorials


