
Rules for Perfect Lighting: Understanding The Inverse-Square Law
Saturday, July 31, 2010

In technical terms, an inverse-square law is defined as “any physical law stating that some physical quantity or strength is inversely proportional to the square of the distance from the source of that physical quantity.” With a definition like that, you’re probably wondering what on earth this could possibly have to do with photography (and no one could blame you). Inverse-square laws apply to many, many things in the world. Today however, we’re only going to be looking at one of them: light.
Explaining The Concept
For those of us without an intense knowledge of advanced mathematics (or even very basic mathematics for that matter) something such as the inverse-square law can seem incredibly daunting. There are equations with numbers and variables, references to physics and many more things which quite frankly seem very boring. For that reason we’re going to try to cover this in a very practical way, rather than a technical one.
The law itself, in photography, applies to lighting. It applies to any sort of lighting really but its most relevant application is with off camera lighting. In a nutshell, the inverse-square law teaches us how light works over distance and why the distance between your light source and your subject is so important.
Let’s say we have a light source which is on full power and our subject is 1 meter away it. If we move our subject double the distance away from the light (2 meters), how much of the light’s power will reach it? The natural reaction is to think “half power” – but unfortunately that’s now how light works, it follows an inverse-square law.
According to the law, the power of the light will be inversely proportional to the square of the distance. So if we take a distance of 2 and square it, we get 4, the inverse of which would be 1/4 or rather, a quarter of the original power – not half.
Moving our subject 3 meters from the light (3 * 3 = 9, so 1/9) the power of our light source now becomes 1/9th of what it originally was.
Here’s how the drops in light power work from 1 to 10 meters, remember that each one is simply the distance squared, over 1.

The inverse square law explains the dramatic drop-off in light over distance. We can use this information to better understand how our lights are affecting our subject and by that measure, how to control them better
Putting It to Work
So knowing about light fall-off is fun and everything… but how can we put it to good use in our photography? Well, it’s all about exposure and relative positioning. When a light shines in a particular direction, initially the drop-off in light is very quick, then it slows down the further it goes.
Remember that with a square law, the numbers get bigger more and more quickly, however with an inverse square law the numbers get smaller more and more slowly.
If we look at our light drop-off from 1 meter to 10 meters in percentages to the nearest whole number, it would look like this:

There’s a 75% drop in light from 1 meter to 2 meters, but only a 5% drop in light from 4 meters to 10 meters.
Exposure
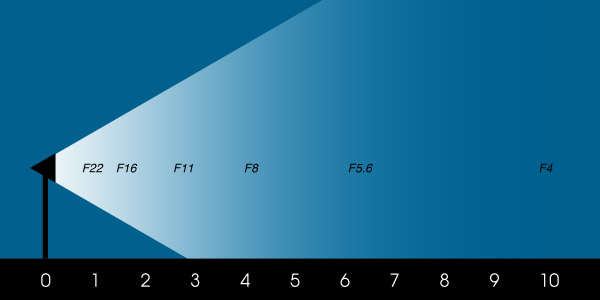
So we understand that there’s lots of power very close to the light source, but only a very small amount of power far away from it. On that basis, to get a correct exposure (assuming we use a consistent shutter speed), if the subject was very close to the light then we would need to set our aperture to around F16, to block out all the excess light.
If, on the other hand, the subject was very far away from the light, then we’d set our aperture to around F4 in order to let much more light in. Both photographs should look identical because we’ve adjusted our camera to let in the same amount of light for each one.

So on that basis, we can plot out a rough estimate of where all the correct F-Stops are to get a correct exposure level. Remember that the light drops off very fast at first, then slower. In the same way, we open up our aperture very fast to start with, then slow down the further we get away from the light.
Lighting One Subject
Let’s move those F-Stop reference numbers up to the top of our diagram as a handy point of reference. Now, some subjects don’t move, which means that once you place it a certain distance from the light source you set your exposure and that’s it.
However, if you’re shooting another person (especially a standing person) they have a tendency to move around. If your model is very close to your light source and she (or he) moves a half step in either direction then she’ll immediately be massively under or over exposed.

However if the model is further away from the light then she can move several steps in either direction without you needing to change any settings on your camera at all.

Lighting Groups
The previous rule works in a very similar way with groups of subjects. If you have all of your subjects very close to the light, then the one furthest away from the light will be very under-exposed compared to the one which is closest to it – covering the range from F22 all the way through to F11.

But if you move all the subjects away from the light source, then they become lit pretty evenly around F4.

Lighting Backgrounds
Of course sometimes you actually want one element of your photo to be bright and one to be dark, such as with a background. So, if you were to place your model very close to the light source with a backdrop some distance away, then (assuming your model is exposed correctly) the backdrop would be very under exposed.

If you instead wanted to have a bright subject with a bright background, then you would have both of them further away from the light source, but close to each other.

Conclusion
This has only been a very brief introduction to the inverse-square law as it applies to light sources in photography. There are many, many variables that can all be tweaked for different effects, such as shutter speed, the brightness of the light source, and adding multiple lights.
Hopefully however, you now understand the basics of the inverse-square law and you can start applying them to your photography to achieve better, more consistent lighting.
If you have any hot tips to help people out with understanding this subject, or anything else you’d like to share, then please do let us know in the comments below!


[get this widget]
Powered by Blogger Tutorials
Canon EOS 5D Mark II and RED
Friday, July 30, 2010


Ok, so we all know how amazing The RED One camera is, and the massive crater is has left in the filmmaking industry. When it was introduced a few years back, it dominated the market and blew the sides off the Hollywood studio system.
Then, in the last year, the filmmaking industry was changed again! An amazing influx of DSLR still cameras with video capability left filmmakers awe struck and astounded at the amazing quality, the leader of which was the one and only Canon 5D Mark II.
Now, as we steadily cruise to the year 2010, we are at the dawn of “high quality, low cost” cameras that will, in my opinion, leave a permanent ripple in the industry from here on out. The most notable of those cameras? Why of course the Canon 7D and the much anticipated RED Scarlet.
We have discovered recently a curious comparison between the Canon 5D and a prototype RED Scarlet that leads us to believe that even the “untouchable” RED company has been shakin’ in their boots about this DSLR revolution.
As you can probably see, RED has modeled their Scarlet very similar to a Canon DSLR. Of course it is missing all the flare of a usual RED, but needless to say, this camera will be compact and powerful! Much like our beloved Canon 5D and now 7D.
Yet the very best thing about both of these amazing cameras is the price…
The Canon 5D and 7D, being consumer products, are both under $3000 respectively (body only).
The real shocker for me is the projected price of the Scarlet (given it’s unbelievable specs!). The brain (or body) of the camera only is priced at $2,500!!
I know we all love our DSLR technology, but if the RED Scarlet ends up at this price, I’m really might consider a switch…
[get this widget]
Powered by Blogger Tutorials
The DSLR Z-Cage from Zacuto
Tuesday, July 20, 2010

The DSLR Z-Cage from Zacuto allows you to have a small, stable, and portable mounting solution for your DSLR cinema rig and all of the accessories used with it. The Z-Cage allows you to gain a better form factor for holding the camera in your hands, giving you more stability when shooting and many options for mounting accessories such as an HD monitor, audio recorder, etc. The Z-Cage uses Zaucuto’s DSLR baseplate and their DSLR handles which are very durable and ergonomic.
The DSLR baseplate is fully adjustable and expandable. You can adjust the height of the plate for compatibility with all DSLR cameras with and without battery grips by using the Allen screws on the front of the baseplate. The DSLR baseplate is also the platform for building your kit into a shoulder mounted rig. A huge advantage Zacuto has over competing cages is that the camera can be quickly released from the rig by turning the red knob on the side of the DSLR baseplate then pulling up the camera. The rods on the front of the baseplate are great for mounting a follow focus or matte box.
Features:
•Works with DSLRs of all sizes – with or without battery grips
•Camera and all accessories are quick release mounted to the cage
•3 handles gives user various holding and handling options
•Uses Zacuto baseplate – adjustable and expandable
Below is a video from Zacuto showing the DSLR Z-Cage in action, with just about everything you’d ever want on your rig:
[get this widget]
Powered by Blogger Tutorials
DSLR Audio
Tuesday, July 13, 2010


So the original desire that many filmmakers wanted with their DSLR was XLR capability. Since that is what “the people” wanted to hear about, it’s what I went looking for. Well after some thought, and a load of interesting opinions, I’m updating our search to include all audio in general to cover all bases. Cool?
AlainP, over at Canon5DTips did a great job reporting on a handful of external audio devices that are worth mentioning. And since audio devices are as abundant as DSLR choices, it all really comes down to what you’ll be using it for…
One of the phrases that likes to be tossed around is: “Filmmakers should be used to using an external audio device anyways.” I agree, we are used to it. Does that mean we what to keep doing it that way? No, not really, syncing audio is a pain in the ass. Especially with DSLR video that wasn’t made to handle audio like a professional video camera does…
Probably the most popular audio device for DSLR filmmakers right now is the Samson Zoom H4N. This guy packs a great punch and is pretty affordable for a low-budget filmmaker. Price is a set at a modest $299. Here a couple of the features:
-Built-in X/Y stereo mics record at either 90° or 120°
-Four channel simultaneous recording using built-in and external mics
-2 XLR inputs with phantom power allow recording with any mic
-Records on SD/SDHC media of up to 32GB for maximum recording time
-Records at CD quality, 16-bit/44.1kHz resolution.
-Built-in mounting joint for tripod and mic stand mounting
-USB 2.0 port for faster file transfer
The guys at Zacuto love it and actually teach classes on advanced DSLR audio with it. The most common complaint is the built-in mics inability to handle wind noise. Kinda makes sense.
The second most popular audio recorder is the M-Audio Microtrack II. This guy is a bit of a downgrade from the H4N, but still holds it’s own. It also records to CF cards which helps when you only want to use one type of card for both audio and video. Here’s some of the features:
-2 channel WAV (BWF) and MP3 recording and playback
-1/4 inch TRS inputs with line inputs and 48V phantom-powered mic preamps
Unfortunately, it doesn’t have XLR inputs, but the audio is still pretty damn good. And at $189, it does a fantastic job.
Next is one of the top of the line external audio recorders, the Fostex FR2LE. We all know Fostex for their DAT recorders; a real staple in the film world. I know I’ve used Fostex DAT when I ran sound for a couple 16mm shorts. Real good quality, but hefty price tag at $599. Here’s some of the features:
-Records to CompactFlash in Broadcast WAV Format (BWF) or MP3 at 24bit 96kHz quality.
-2 professional phantom powered XLR microphone inputs.
-Features a 1 take = 1 file recording system which eliminates overwrites.
-2 second ‘pre-record’ buffer.
-USB 2.0 for high speed file transfer.
-Designed specifically for location sound recording.
Basically for anyone who has used Fostex before, this is the best of the best for compact audio recording on a run-and-gun film set.
The next two audio recorders I will mention are really for those people who want direct contact with their audio and the camera itself. The first of which is the BeachTek DXA-5D, which was designed with the Canon 5D Mark II in mind. It’s pretty inexpensive as well, at $375. Here’s some of the features:
-Disables the camera’s audio gain.
-2 48V phantom powered XLR inputs with manual controls.
-Headphone & Line output jacks.
-Works best with Canon 5D Mark II, Canon 7D, and Nikon D300s.
-Camera & tripod mountable.
With all the DSLR specific design aspects, this device seems like a no brainer. No syncing in post and easy to use. But sometimes having an external device allows for a little more creativity with your sound, which I know a lot of people like. It’s all up to personal use.
Lastly, there is one more audio recorder that fares well in the DSLR market. It’s the juicedLink CX231. Set a little cheaper than the BeachTek at $299, it holds up well with a lot of the same features:
-48V and 12V Phantom powered XLR inputs.
-1/8″ (3.5mm) Mini Output.
-Three Gain Settings.
-Camera & Tripod Mountable.
Ok, so now that I’ve gone on and on about this crap, it’s time for everyone to make their own opinions on what they want to use. I’ve presented options, that’s all.
[get this widget]
Powered by Blogger Tutorials
5 things i always wanted for my DSLR
Sunday, July 11, 2010


With the introduction of a variety of DSLR cameras that support HD video, many companies have been on the fast track to get you the coolest, craziest, and cheapest accessories from your filmmaking needs. There are camera support rigs, dollies, adapters, viewfinders and countless other “additions” for productions of any type.
But as filmmakers, what do we want to see with our DSLRs? What have we been craving to see happen that would take our stories to the next level? Well, we have compiled a list of the top things filmmakers have been interested in:
1) The Panavision Lens Mount - We know it’s out there, but how does it work? How can we benefit?
2) XLR Inputs - Syncing audio can be a pain in the ass… What’s out there to help?
3) DSLR 3-D - Is it possible to shoot 3-D with DSLRs? Two of them together? We’ll find out for you.
4) Anamorphic Converter - Hollywood is doing it, why can’t we? Believe it, it is possible…
5) Underwater Housing - We’ll find the best one for your next James Cameron impersonation.
Join us for the next couple weeks as we investigate, probe, search, and ponder about how we can achieve these things and more to get us going on the DSLR revolution! Check back here and tell all your friends!
[get this widget]
Powered by Blogger Tutorials
Lensbaby for better DSLR movie making with 500D, 550D, 7D, 5D mark11, 1D mark4
Friday, July 9, 2010

The Lensbaby line for DSLR users consists of 3 Creative Effects lenses with 6 optics available to swap in an out. The lenses are compatible with Canon, Nikon, Sony, Pentax and 4/3’s mount DSLR cameras. The ideal Lensbaby lens for DSLR movie makers is the Control Freak: the user can compress and bend the lens to find the desired Sweet Spot, and then lock it in place with the push of a button. Once locked, focus can be fine tuned using the barrel focusing ring and adjust the tilt with the Control Freak’s three metal posts.
The Control Freak comes with the Double Glass Optic installed. Other available optics include: Single Glass Optic, Plastic Optic, Pinhole / Zone Plate, Soft Focus, and Fisheye Optic.
The Lensbaby is a low-cost alternative for providing tilt and swing for many DSLR cameras, although the effect is somewhat different from that of conventional tilt-shift lenses. Because of the simple optical design, there is significant curvature of field, and sharp focus is limited to a region near the lens axis. The system is however a great value considering the varied amount of in-camera effects that can be achieved.
Features:
•Provides filmmakers with the ability to shoot both free-hand and locked down
•Compatible with all Lensbaby Optic Swap System optics
•Manual Focus
•Interchangeable levitating aperture discs (f/2 – f/22)
•Three metal rods to fine tun tilt
[get this widget]
Powered by Blogger Tutorials


