
Canon EOS 60D
Tuesday, August 31, 2010

Canon EOS 60D
For photographers who want to transfer content wirelessly, the EOS 60D includes Eye-Fi connected functions*2. The EOS 60D features a dedicated Eye-Fi section in the User Interface allowing WiFi functionality to be turned off when not required to save battery life
EOS 60D features at a glance:
18 MP APS-C CMOS sensor
Advanced creative features with Basic +
Vari-angle 7.7cm (3.0”) 3:2 ratio LCD
Full HD movies with manual control
DIGIC 4
ISO 100-6400, H:12800
5.3fps shooting for up to 58 JPEGs
9-point cross type AF System
iFCL metering with 63-zone Dual-layer Sensor
Integrated Speedlite transmitter
In-camera RAW processing
*1 1:1, 16:9, 4:3 in addition to the standard 3:2 dimension
*2 This product is not guaranteed to support Eye-Fi card functions (including wireless transfer). In case of an issue with an Eye-Fi card, please check with the card manufacturer. Also note that approval is required to use Eye-Fi cards in many countries or regions. Without approval, use of the card is not permitted. If it is unclear whether the card has been approved for use in the area, please check with the card manufacturer


[get this widget]
Redrock Micro for DSLR
Monday, August 30, 2010

Redrock Micro has announced a new “nano” line of DSLR cinema rigs and accessories. The new line of rigs are designed with discreet shooting applications and low-cost entry – mostly under $500.
Redrock Micro
Hollywood, CA – Redrock Micro, the recognized leader in affordable professional-quality cinema accessories, today announced the new nano line of accessories and rigs for video DSLR cameras. The nano line of equipment is an extension to Redrock’s current award-winning rigs and accessories for HDSLR cameras, and is designed for low-cost entry level, photojournalism/documentary, and discreet shooting applications. The nano rigs are manufactured to precision professional standards, and can be easily upgraded to more advanced rigs as needed. Developed from extensive customer interviews and input, the nano line delivers the ideal balance of economy and professional quality in compact support rigs.
The nano line of products consists of 7 new rigs and 5 new accessories:
Nano rigs:
Grippit™
runningMan™
LowDown™
LowDown Deluxe
Stealth™
Stealth Grip
Stealth V (“vee”)
Nano accessories:
Nano baseplate
Nano focus+zoom lever
microHandle Plus (with integrated shoe mount)
2” 15mm carbon fiber rails
2” handlebar rod
“We developed the nano rigs from extensive input from professional and aspiring still/motion photographers,” said James Hurd, Chief Revolutionary for Redrock Micro. “Customers said they wanted additional options that were smaller, more lightweight, and offered an affordable entry point, all while maintaining Redrock professional quality and interoperability.”
[get this widget]
Planet digimag
Sunday, August 29, 2010

PLANET digimag is an online and downloadable digital magazine for Earth’s citizens.
Their content, which is packed with video, animations, graphics, beautiful photos and punchy text, will show you that sustainable living can be fun, engaging and also cost-effective.
They cover the world, exploring and investigating the environmental and lifestyle concerns of our time – climate change, energy, transport, food, society, culture, and of course, biodiversity and Earth’s great wild landscapes.
[get this widget]
The last roll of Kodachrome film ever created has wound up in good hands.
Friday, August 27, 2010

The last roll of Kodachrome film ever created has wound up in good hands.
Famed photographer and photojournalist Steve McCurry, who captured “Afghan Girl” (at left), an image that has been called “the most recognized photograph” in the history of National Geographic magazine, was given the final strip of the iconic film.
The world’s most commercially successful film for much of the 20th century, Kodachrome gained popularity beginning in the Great Depression for its vibrant colors, sharpness and durability. Tragically, the Eastman Kodak Co. officially discontinued the iconic film last year after deciding digital photography is the wave of the future. They decided to give the final roll of 36 exposures to McCurry.
So what will he do with the precious strip? That’s the subject of a new documentary from National Geographic, which follows the veteran photojournalist as he travels the world and attempts to give Kodachrome a proper send-off.
“I thought, what better way to kind of honor the memory of the film than to try and photograph iconic places and people? It’s in (my) DNA to want to tell stories where the action is, that shed light on the human condition,” the photographer said.
McCurry (who has already developed the film at Dwayne’s Photo Service in Parsons, Kan. — the last place in the world that develops Kodachrome film) pointed his camera at a number of New York City landmarks, including The Brooklyn Bridge and Grand Central Station, as well as famous faces like Robert De Niro. Then he headed to India, returning to where he shot some of his most notable work, all on the classic film.
The documentary, which chronicles McCurry’s 6-week trip around the world and the pressure of capturing something important in each precious image, is scheduled to air sometime early next year.
What about you? If you had the very last roll of Kodachrome film, what would you photograph?
[get this widget]
Pixelatedimage best for dslr photographers
Tuesday, August 24, 2010

it is the title of a book I cherish a lot in Photography. There are many books out there, which talk in length on the technique behind photography and other on the philosophy on it. Not many are there which draws a line in between.
I picked up this book during one of the photography exhibition, caught the book by accident, and I found the book was much better than the exhibition. This is how I was introduced to David duChemin.
David duChemin is a Vancouver-based international assignment photographer specializing in Humanitarian and world photography. A nomad, visionmonger, unashamed do-gooder, and sometimes author, David's photography is online at Pixelatedimage.com.
His words are available at Pixelatedimage.com/blog and in his first book is Within The Frame, The Journey of Photographic Vision.
[get this widget]
SLR Lenses for Cinematography
Sunday, August 22, 2010


SLR Lenses for Cinematography
Manual focus SLR lenses from Carl Zeiss offer a harmonic image even under low-light conditions. With digital SLR cameras these lenses show crisp images throughout the entire range. The very smooth focus allows perfect follow focus applications.
Large rotary angle for pinpoint focusing
High quality, smooth focusing mechanism without play
Precise engraving in meters and feet
Stray light reduction for rich colors
Optimum correction of distortion
Practical focusing and aperture setting ring in metal
Application:

With their exact, precise focusing system and superbly balanced bokeh, SLR lenses from Carl Zeiss offer many excellent possibilities for personalized manual composition. All ZEISS SLR lenses are supported by extraordinarily high-contrast color rendition and an outstanding 3D effect in the image.
[get this widget]
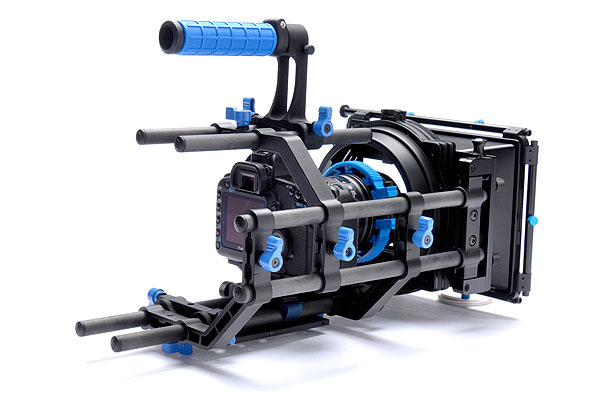
The Redrock DSLR Camera Bundle
Friday, August 20, 2010

The Redrock DSLR Cinema Bundle is a comprehensive package for converting video DSLRs to useful cinema production tools. This bundle is compatible with most video DSLRs including the Nikon D90 and Canon 7D, Canon 5D Mark II, and can be adapted for use with full size DSLRs such as the Canon 1D MKIV** and Nikon D3s**.

[get this widget]
Special camera accessories and products for all canon eos and other cameras
These fine companies offer specialty or discount camera accessories and supplies. If you have a photographic need such as improving the ergonomics or functionality of your camera, or simply want to save a little money on supplies, one of these companies may have exactly what you’re looking for.
 ClearViewer
The ClearViewer is a folding high-diopter lens that lets you view and focus on the LCD screen with your eye right up to the lens. See fine detail in a variety of lighting conditions. ClearViewer comes in two versions: the tripod socket model and one that attaches to a hotshoe. The company has viewers for several camera models in stock or will make one for your specific camera make and model. Orders are shipped by Priority Mail in the U.S. and International Standard or Priority Mail to non-U.S. countries.
 Hoodman
The Hoodman Corporation manufactures unique digital camera accessories that make the photographer’s / videographer’s job a little easier. Their offerings include such things as viewfinder hoods, right-angle viewfinders, camcorder hoods, loupes and eye cups. Hoodman has a 30 day return policy, for any reason. A product will be replaced or you’ll get a a full refund of purchased price.
Lensmate sells a wide range of accessories such as conversion lenses, filters, lens caps and quick-change adapter kits. Their website offers helpful information, tips and samples of photos, including EXIF data, taken with and without various popular converter lenses. This information will prove invaluable in helping you evaluate if a product is suitable for your needs. You can return or exchange an item, excluding any shipping charge, within a 10 day period.
Red River Paper
Red River Paper sells high quality, premium photographic inkjet papers at up to a 40% discount. The paper comes in a variety of sizes, weights and finishes. They sell Fine Art, Coated and Double Sided Inkjet Papers. Red River Paper also sells specialty and roll inkjet papers and paper in big sheets including panoramic sizes. For those who use Epson & Canon printers, they offer genuine ink cartridges at a slight discount. The company has a 30 day return policy.
 Richard Franiec’s camera accessories
Richard Franiec manufactures a collection of custom-made, limited-edition camera accessories including custom grips, hot shoe covers, remote cable releases and more. The components are made to the highest standards and help enhance the photographic experience. Shipping rates are reasonable and Richard accepts returns in the unlikely event you’re not satisfied with one of his products.
SterlingTek
SterlingTek sells all sorts of digital camera accessories including adapters, memory cards and card readers, camera tripods and camera bags. Their highly regarded digital camera batteries sell at prices far below the prices charged by the original equipment manufacture; plus the batteries are often a higher capacity. SterlingTek offers a 30 day full money back guarantee on all products. Plus if anything breaks under normal use within the first year, you can send it back for a free replacement.
[get this widget]
Bokeh Master’s Kit for canon eos DSLR cameras
Friday, August 13, 2010
What is Bokeh?
Before we go into what the product does, you should understand the concept of bokeh. When you have a lens that is of ample quality to produce a relatively shallow depth-of-field, the background becomes extremely blurry when the foreground is in focus (and vice-versa).
Because of a whole lot of complex physics (aka. spherical aberration) and the way light is fed through the lens, out of focus points of light essentially take on the shape of your aperture. In most cameras, this produces a round or near-round (sometimes slightly octagonal) shape representing the points of light in the distance.
Though the lens and aperture are distorting the true image, the result is something quite beautiful and is generally regarded as a positive feature of an image.

The image above is a perfect example of how bokeh can add significant aesthetic value to an image (image source). Keep in mind that this image was taken at f/2.2. If your lens doesn’t go below f/4 or so, you might have a hard time producing a good bokeh.
The Bokeh Master’s Kit
What the Bokeh Master’s Kit does is change the shape of the bokeh in an image by filtering the light through a custom-shaped hole on the front of your lens.

As you can see in this sample image from the kit’s website, the results can be quite fun and unique. So how does it do this exactly? Let’s take a look.
What You Get
To give you a good idea of what you’ll get in the kit, here are a couple of pictures that I took when I first received mine.


As you can see, you get five plastic sheets containing pieces to punch out. The red sheet is a little box that you fold up to hold your disks, and the rest are disks containing different shapes to mold the bokeh along with the holder piece that is placed over the camera.

How To Use It
To use the kit, simply place one of the disks in the holder, place the holder over the front of your lens and use the included rubber band to strap it on.
The tricky part is that you can’t just take a picture of anything. You have to create a setup like the asian doll picture above where a good bokeh is already being produced. Remember that the kit modifies bokeh, it doesn’t create it!
My Real Experience
When I first received the Bokeh Master’s Kit, I was a little hesitant to attach it to my lens with the rubber band. Sure enough, when I tried it, the rig in combination with an autofocus lens (and therefore a moving lens) seemed to be a bad combination as it was wearing on the gears a bit.
Turning the autofocus off was an easy solution, but then you’re forced to manually focus and my focus dial is unfortunately near the front of my lens, which was obstructed by the bokeh kit. In the end I found it to be easy enough to place a disk in the holder and then just hold it in front of my lens while I shot.
However, I think the disk holder would be much better if it were actually a lens attachment similar to a modified polarizer or lens cap. This would really increase both manufacturing costs and the end customer price, but the improved setup would be worth it.
Moving on to usage, I first tried the kit with a low grade Canon 18-55mm F/3.5-5.6 lens. Unfortunately, the results with this lens were quite fickle. Though I could fairly easily produce a decent bokeh, it was really tricky to get the kit to reshape it in any way. Despite the fact that I was trying to produce a star, I kept getting Pac Man shapes!
My Success
Faced with failure on my cheap kit lens, I decided to get more serious and pulled out a Canon f/2.8 lens. To setup the shot, I grabbed a few studio lights, set a toy catapult on a pool table, and placed a pile of Christmas lights in the background. Here’s what I came up with straight from the camera.

Just to give you a good idea of what’s going on here, the settings are as follows: 1/15 sec exposure (with flash and tripod), f/3.2, 100mm. As you can see, the bokeh is coming through quite nicely.
This time, equipped with a decent lens and a better setup, the effect of the bokeh kit was instant and required zero fiddling with settings or adjustments. In fact, the results were excellent!
Placing the bokeh kit over the lens considerably darkens the image but as long as you adjust your settings accordingly it’s not a problem. Also, it places a dark vignette around the edge of the photo. Some photographers might find this annoying but I was loving the effect on this particular setup.
Though I was frustrated with the results from the cheaper lens, once I had the right setup I found the kit to be a blast to use. It’s an admittedly cheesy effect but it’s something you can’t normally achieve and is really neat to have on hand for certain occasions.
Conclusion
So should you get one? I vote yes. It’s currently only $25, which you’ll earn back in positive comments from your friends and family wondering how the heck you achieved the amazing effect. The best application I can think of is for children’s portraiture. The fun shapes really lend themselves to kid photography and you’ll no doubt snag a few clients with the originality of the images.
Before you purchase anything, just remember my advice about making sure your lens is up to par and also that it’s probably a good idea to turn off auto-focus prior to attaching the kit to your lens.
For all you do-it-yourselfers out there, the effect is actually pretty easy to achieve on your own. Check out this guide from DIY Photography or run a search on Flickr for “custom bokeh” to see what others have come up with.
Use the comment section below to let us know what you think of the product and whether or not you’ll be ordering one. Also be sure to let us know if there are any other products you’ve been considering purchasing that you’d like us to review.
[get this widget]
The revaluation of Canon Dslr video making
Thursday, August 12, 2010
This is the new style of dslr film making, an arri lens is attached to a canon eos 7D, what an idea, i wish one day i could do the same, guys you were thinking of doing somthing like this before, then watch this video, you have your answer for the question, dslr video making with arri lens.
[get this widget]
National Geography
Saturday, August 7, 2010
Shoot Great Video with Your Canon DSLR Camera
Friday, August 6, 2010

Video Tutorials : Blue Crane Digital - Shoot Great Video with Your Canon DSLR Camera
Author: BinhBasket | 11 June 2010 | : 0
Blue Crane Digital - Shoot Great Video with Your Canon DSLR Camera
English | AVC1 854x480 | AAC 160 Kbps 2CN | 2.72 GB
Genre: eLearning
Canon's video-equipped digital SLR cameras can capture professional quality HD video, but getting great video from a still camera is not simple or intuitive. Getting the results you want requires a lot more than exposure, focus and white balance. Happily we've already done the research! You'll learn the skills and secrets to producing great video. This DVD is intended for the still photographer moving into video for the first time. You'll benefit from the wealth of tips and techniques offered in this presentation.
Topics include:
* Sound recording
* Composition
* Lighting and equipment
* Aliasing/Artifacts
* Video compression
* Exposure
* White balance
* Picture styles
* Camera movement
* Lenses
* Tripods and camera mounts
* Video production skills
Learn how to maximize your camera's strengths in just a couple of hours. With this video and a little practice, your video can look and sound exactly as you imagined it.
Whether you shoot with a 1D Mark IV, a 7D, a 5D Mark II, a T2i, or any other Canon DSLR that captures video, understanding the challenges and your options for overcoming them can make all the difference.
Screenshot
mORE iNFO
_http://www.bluecranedigital.com/sgvc.htm
Download from Hotfile
http://hotfile.com/dl/47637501/0384bbc/shareislove_BCD.SGVWYCDSLR.part01.rar.html
http://hotfile.com/dl/47637839/7faf2aa/shareislove_BCD.SGVWYCDSLR.part02.rar.html
http://hotfile.com/dl/47638237/c81a6c4/shareislove_BCD.SGVWYCDSLR.part03.rar.html
http://hotfile.com/dl/47638503/a545aa7/shareislove_BCD.SGVWYCDSLR.part04.rar.html
http://hotfile.com/dl/47638834/ac46d28/shareislove_BCD.SGVWYCDSLR.part05.rar.html
http://hotfile.com/dl/47638971/945eeb2/shareislove_BCD.SGVWYCDSLR.part06.rar.html
http://hotfile.com/dl/47639096/a90fa82/shareislove_BCD.SGVWYCDSLR.part07.rar.html
http://hotfile.com/dl/47639199/31e1fc8/shareislove_BCD.SGVWYCDSLR.part08.rar.html
http://hotfile.com/dl/47639200/53d58f5/shareislove_BCD.SGVWYCDSLR.part09.rar.html
http://hotfile.com/dl/47639225/13f8f79/shareislove_BCD.SGVWYCDSLR.part10.rar.html
http://hotfile.com/dl/47639388/777d135/shareislove_BCD.SGVWYCDSLR.part11.rar.html
http://hotfile.com/dl/47639486/9223bda/shareislove_BCD.SGVWYCDSLR.part12.rar.html
Download from Fileserve
http://www.fileserve.com/file/dHT6gAn/shareislove_BCD.SGVWYCDSLR.part01.rar
http://www.fileserve.com/file/Y2XQ7Hb/shareislove_BCD.SGVWYCDSLR.part02.rar
http://www.fileserve.com/file/bCShprR/shareislove_BCD.SGVWYCDSLR.part03.rar
http://www.fileserve.com/file/ZQArS3z/shareislove_BCD.SGVWYCDSLR.part04.rar
http://www.fileserve.com/file/3XCZtG5/shareislove_BCD.SGVWYCDSLR.part05.rar
http://www.fileserve.com/file/9EvN8VQ/shareislove_BCD.SGVWYCDSLR.part06.rar
http://www.fileserve.com/file/ZDgmmp3/shareislove_BCD.SGVWYCDSLR.part07.rar
http://www.fileserve.com/file/gzcYJfb/shareislove_BCD.SGVWYCDSLR.part08.rar
http://www.fileserve.com/file/GdpJSxT/shareislove_BCD.SGVWYCDSLR.part09.rar
http://www.fileserve.com/file/eAZ2HYw/shareislove_BCD.SGVWYCDSLR.part10.rar
http://www.fileserve.com/file/kjx7bkg/shareislove_BCD.SGVWYCDSLR.part11.rar
http://www.fileserve.com/file/e6Bt8rP/shareislove_BCD.SGVWYCDSLR.part12.rar
Download from Sharingmatrix
http://sharingmatrix.com/file/7716117/shareislove_BCD.SGVWYCDSLR.part01.rar
http://sharingmatrix.com/file/7716127/shareislove_BCD.SGVWYCDSLR.part02.rar
http://sharingmatrix.com/file/7716103/shareislove_BCD.SGVWYCDSLR.part03.rar
http://sharingmatrix.com/file/7716113/shareislove_BCD.SGVWYCDSLR.part04.rar
http://sharingmatrix.com/file/7716101/shareislove_BCD.SGVWYCDSLR.part05.rar
http://sharingmatrix.com/file/7716091/shareislove_BCD.SGVWYCDSLR.part06.rar
http://sharingmatrix.com/file/7716095/shareislove_BCD.SGVWYCDSLR.part07.rar
http://sharingmatrix.com/file/7716105/shareislove_BCD.SGVWYCDSLR.part08.rar
http://sharingmatrix.com/file/7716111/shareislove_BCD.SGVWYCDSLR.part09.rar
http://sharingmatrix.com/file/7716135/shareislove_BCD.SGVWYCDSLR.part10.rar
http://sharingmatrix.com/file/7716179/shareislove_BCD.SGVWYCDSLR.part11.rar
http://sharingmatrix.com/file/7716141/shareislove_BCD.SGVWYCDSLR.part12.rar
Tags: Blue Crane, Shoot, Great, Canon, DSLR Camera
Torrent Mirror: Blue Crane Digital - Shoot Great Video with Your Canon DSLR Camera
More Mirrors: Blue Crane Digital - Shoot Great Video with Your Canon DSLR Camera
[get this widget]
Color Temperature
Wednesday, August 4, 2010
As photographers all we need to know is that different types of light source emit different colors. 5000 kelvins is what we photographers call white light and is represented by 'average daylight', whatever that is, actually it's fairly obvious if you look at the chart below. We also need to know that household bulbs give off an orange light and a cloudy day will appear blue. Here's a color temperature chart covering typical light sources. In the last column I have put my recommended camera setting for each type of light. As you can see, one setting can cover several steps on the scale.

When we look at objects with our eyes, we perceive white objects as white, and gray objects as gray, no matter what sort of light source we are viewing them by. This is because our brain is making the conversion for us. We 'know' that wall is white so we don't notice that it looks yellow at night (with the room lights on). If you really start to look you can see these color differences to some extent, but they are not as noticeable as they are to the camera.
Modern cameras have 'automatic white balance' so why can't we just leave it all to that? The AWB does do quite a good job but it isn't 100% accurate all the time. So sometimes we need to be able to do a few corrections ourselves
[get this widget]


