
Viewing Your T1i Images
Saturday, September 26, 2009
Viewing Your Images
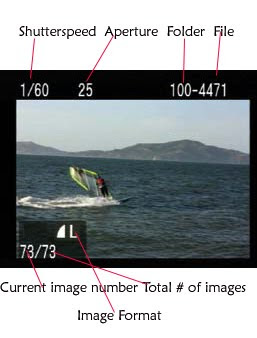
As you’ve seen, the T1i displays your image for a brief time after you shoot. As you’ll
see later, you can extend this time by changing a menu setting. But when it comes
time to review your images, you’ll want to use the camera’s playback mode.
To review your images, press the Play ( ) button on the back of the camera (obviously,
the camera needs to be powered on for this to work).
The camera displays the last image that you shot, along with some status information.
(If you don’t see the image number and format information, press the
DISP button once.)
The left and right arrow keys on the back of the camera let you navigate forward
and backward through your images. Playback mode has a number of other features
that you’ll learn about in Chapter 3.
At any time, you can press the Play button again or give a half-press to the shutter
button to return to shooting mode. Note that the T1i can change between shooting
and playback modes very quickly, much faster than most point-and-shoot
cameras, meaning you don’t have to worry about missing a shot because the
camera is locked up in a playback mode.


[get this widget]
As you’ve seen, the T1i displays your image for a brief time after you shoot. As you’ll
see later, you can extend this time by changing a menu setting. But when it comes
time to review your images, you’ll want to use the camera’s playback mode.
To review your images, press the Play ( ) button on the back of the camera (obviously,
the camera needs to be powered on for this to work).
The camera displays the last image that you shot, along with some status information.
(If you don’t see the image number and format information, press the
DISP button once.)
The left and right arrow keys on the back of the camera let you navigate forward
and backward through your images. Playback mode has a number of other features
that you’ll learn about in Chapter 3.
At any time, you can press the Play button again or give a half-press to the shutter
button to return to shooting mode. Note that the T1i can change between shooting
and playback modes very quickly, much faster than most point-and-shoot
cameras, meaning you don’t have to worry about missing a shot because the
camera is locked up in a playback mode.

[get this widget]
Powered by Blogger Tutorials
The LCD Status Display of canon eos 500d/kiss x3/t1i
Monday, September 21, 2009
The LCD Status Display
In addition to the in-viewfinder status display, the T1i also shows a lot of status
information on the rear LCD. What’s displayed on the screen varies depending
on what mode you’re in, simply because in some modes you don’t have as much
manual control and so don’t need as much status feedback. In Full Auto mode,
your screen should look something like the image on the next page.
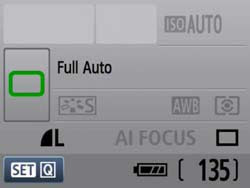
In Full Auto mode, the LCD screen should look something like this.
As you can see, you can easily tell how many shots are remaining, how charged
the battery is, and the image format that you’re shooting in. The camera also
shows what light-metering mode you’re using, which, to be honest, is kind of
strange, because you can’t actually change this when shooting in Full Auto.
When you half-press the shutter button to tell the camera to focus and meter,
it displays its chosen shutter speed and aperture at the top of the status display.
We’ll explore what these mean in later chapters.
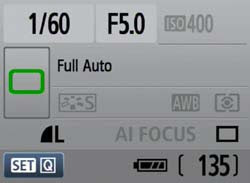
After you half-press the shutter button, the status screen will show
your shutter speed and aperture.
Just below the viewfinder, you can see a small black window. This is a sensor that
detects when you have the camera held up to your face. As you raise and lower
the camera, the 500d automatically disables and enables its LCD screen, so that it
doesn’t distract you while shooting. You can also turn the display off completely
by pressing the DISP button. Pressing it again reactivates the screen.
Shoot some more in Full Auto mode and get comfortable with the camera’s controls.
Even though the camera has a lot of other buttons and dials, you don’t really
need to worry about them right now.
TIPs
If you wear glasses and like to remove them when shooting, you can use the diopter control, the small knob next to the viewfinder, to compensate for some near- or farsightedness. Turn the knob until the nine autofocus boxes inside the viewfinder are sharp. Note that the diopter may not be able to completely compensate for extremely bad vision. Also, you’ll have to change it again if you put your glasses back on. If the viewfinder ever inexplicably goes out of focus, it might just be that you bumped the diopter knob. Turn it until focus is restored. If the diopter does not offer enough correction, you’ll want to look at Canon’s replacement diopters.
[get this widget]
Powered by Blogger Tutorials
The view finder status display of canon eos 500d
Saturday, September 19, 2009
The Viewfinder Status Display
When you press the shutter button halfway down, several things happen inside
the T1i’s viewfinder. As I already mentioned, the camera shows you which focus
points it has selected for autofocus. It also uses the readout at the bottom of the
viewfinder to tell you about its exposure choices and to give you some additional
status information. The content of this readout will vary depending on the mode
you’re in.
From left to right, the readout includes the following:
• If the camera has chosen to use the flash, it will display the flash icon. The flash
icon will blink on and off, and the word busy will be displayed, until the flash unit
is charged and ready to go. If your battery has a good charge, this shouldn’t take
very long.
• Next, the camera displays its chosen shutter speed and aperture. You’ll learn
more about these in Chapter 5.
• The Exposure Compensation display is shown next. It has a range of -2 stops
to +2 stops.
• Next comes ISO choice. For now, all you need to know is that the higher the
number is, the grainier your images will be. Don’t worry about this now; we’ll
discuss it in more detail later.
• Finally, you’ll see a number showing how many shots you can shoot before
you will have to wait for the camera’s buffer to empty. The camera has enough
onboard RAM to shoot nine images when in Full Auto mode. Although this
may not sound like much, remember that as soon as you shoot, the camera
immediately starts writing its buffer out to the storage card.
So, if you’re not shooting too fast, you’ll never come close to overrunning the
buffer. If you’re shooting bursts of images—at a sporting event, say—then you
might fill up the buffer and have to wait a moment before you can shoot
again. You don’t have to wait until all nine images are available. As long as the
number reads at least 1, you can still shoot.
• Finally, at the far right of the display is a green dot that appears whenever the
camera has locked focus and is ready to shoot. When you press the shutter
button halfway, you can press the rest of the way once this green dot appears.
As you can see, the status display includes a few other indicators, which you’ll
learn about in later chapters.
[get this widget]
Powered by Blogger Tutorials
Framing your Shot with canon eos 500D
Monday, September 14, 2009
Framing Your Shot
This next part you probably already know: look through the viewfinder and frame
your shot. If you have a zoom lens attached to your camera, you can zoom to
frame tighter or wider. For now, we’re not going to worry about composition,
because we’ll be discussing that in detail later.
Autofocus, or “How to Press the Shutter Button”
With your shot framed with canon eos 500d, you’re ready to shoot. However, although pressing the
shutter button may seem a simple thing, there are some important things to understand
about it, because it’s your key to the camera’s auto focus feature.
Once you’ve framed the shot, press the shutter button halfway. When you do this,
the Canon 500D will analyze your scene and try to determine what the subject is.
The camera can analyze nine focus points. Once the T1i has determined the
subject (or what it thinks is the subject), it will light up the focus point that it
thinks is correct. If more than one point sits on the plane of focus, it will light
up them all.

When you half-press the shutter button to autofocus, the XS will light up the focus
spots that it thinks are correct for your subject.
Very often, several potential subjects sit on the same plane (that is, they’re all the
same distance from the camera). The T1i will show you all the focus points that it
considers in focus. As long as one of them is on your subject, then it has focused
correctly.
When the T1i has achieved focus, it will beep and show a green circle on the right
side of the viewfinder status display. (You can see this in the previous figure.)
This half-press of the shutter is a crucial step when using the T1i (or any other
autofocus camera). If you wait until the moment you want to take the shot and
then press the shutter button all the way down, you’ll miss the shot, because the
camera will have to focus, meter, and calculate white balance before it can fire,
and these things take time.
WA R N I N G : Don’t Zoom After Locking Focus
Once the camera has locked focus, don’t adjust the zoom control. Focusing
at a specific distance is a function of your current focal length. If you change
focal length (that is, if you zoom in or out), you’ll throw your image out of
focus.
r e m in d e r : “My flash popped up!”
In Full Auto mode, the T1i will decide whether it needs to use the flash. If it
decides that it needs it, the flash will automatically pop up and will be fired
when you take the shot.
[get this widget]
Powered by Blogger Tutorials
Snapshot Shooting with canon eos 500d in Full Auto Mode
Sunday, September 13, 2009

Snapshot Shooting in Full Auto Mode
The Rebel T1i has full autofocus and autoexposure features that can make all
of the necessary photographic decisions for most situations. When in Full Auto
mode, all you have to do is frame the shot and press the shutter button, and
the camera will automatically figure out just about every other relevant setting.
However, you need to know a few things to get the most out of Full Auto mode.
On the top of the T1i, on the right side of the camera, is a Mode dial. The mode
you choose determines which functions the camera will perform automatically
and which will be left up to you. So, if you want more creative control, then you’ll
want to select a mode that offers less automation and leaves more power in your
hands.
For snapshot shooting, Full Auto mode will be your best bet and will make your
T1i function much like a simple point-and-shoot camera—but one that delivers
the superior image quality of an SLR. To select Full Auto mode, set the Mode dial
to the green box ( ).

The 18–55mm lens kit includes an autofocus switch, and most other lenses will
have a similar switch. Make certain it’s set to AF.
If you haven’t done so already, take the lens cap off the camera. You don’t have
to worry about accidentally shooting with it on, because if the lens cap is on, you
won’t see anything in the viewfinder. Make sure the switch on the lens is set to
Autofocus, not Manual.
[get this widget]
Powered by Blogger Tutorials
Resetting the Camera’s Defaults of eos 500d
Saturday, September 12, 2009

Resetting the Camera’s Defaults of canon eos 500d
If you’ve already been playing with your T1i, you might have made some changes
to some of the internal settings. To ensure that your camera behaves the way that
I’ll describe in this book, reset to the camera’s defaults:
1. Set the Mode dial to P, then press the Menu button.
2. Press the right arrow button on the back of the camera until the second-tolast
menu is selected.
3. Press the down arrow to select “Clear settings”.
4. Press the Set button to execute the “Clear settings” command, then select
“Clear all camera settings” and press Set.
5. The camera will ask you to confirm the operation. Select OK and press Set.
6. Then, choose Clear all Custom Func. and reset those as well.
[get this widget]
Powered by Blogger Tutorials
Advanced use of canon eos 500D
Wednesday, September 9, 2009

Most of us brought canon eos 500D, but how to use it in a better way, we are not sure, i mean those who brought who are not professional in this field, I have seen this setup of canon eos 500d in a magazine, were they used it for shooting commercial advertisements, so with this canon kiss x3 DSLR camera you could earn money in that way also.
So i have decided to approach some small companies in my country to shoot commercial advertisements for them in a small budget, then i thought of making canon eos 500d to a professional look, you could see the pictures how i made this setup. Its really amazing, you could get the real commercial shots of gib movements and dolly movements, so try it guys and earn some money
[get this widget]
Powered by Blogger Tutorials
Before Shooting with canon eos 500d
Monday, September 7, 2009
If you haven’t yet set up your camera, you need to do a few things before you
can shoot with it. Fortunately, the T1i’s manual is very good, and you can learn
everything you need to know about setup by reading the following sections of
the manual:
• The camera battery may have a little charge when you first unpack the camera,
but t’s best to give it a good refueling before you head out to shoot. Read
pages 24–26 of the Rebel T1i manual to learn about charging and installing
the battery.
• You’ll need a Secure Digital (SD ) memory card for your camera. The Rebel
T1i does not ship with a card, so you’ll need to buy one. Any photography
store or electronics store should carry them. You can learn how to install and
remove the card on pages 31–32 of the T1i manual.
• A lens must be attached to your camera. If you bought the Rebel T1i kit, then
you probably got an 18–55mm lens. If you bought the body-only package,
then you should have bought a lens separately. You can learn how to attach
and remove a lens on pages 33–34 of the T1i manual.
• The power switch on the top of the camera powers up the camera (as long as
you have a charged battery installed). If it’s the first time you’re turning the
camera on, then the camera will prompt you to enter the date and time. Page
29 will walk you through setting the date and time, and page 30 will show
you how to set the language that you want to use in the camera’s menus.
• Finally, the camera includes a shoulder strap. The best way to ensure that
your camera doesn’t get damaged is to attach the shoulder strap and use it!
The camera will be more secure and easier to carry if you have the strap attached.
Page 23 of the T1i manual shows how to attach the strap.
[get this widget]
can shoot with it. Fortunately, the T1i’s manual is very good, and you can learn
everything you need to know about setup by reading the following sections of
the manual:
• The camera battery may have a little charge when you first unpack the camera,
but t’s best to give it a good refueling before you head out to shoot. Read
pages 24–26 of the Rebel T1i manual to learn about charging and installing
the battery.
• You’ll need a Secure Digital (SD ) memory card for your camera. The Rebel
T1i does not ship with a card, so you’ll need to buy one. Any photography
store or electronics store should carry them. You can learn how to install and
remove the card on pages 31–32 of the T1i manual.
• A lens must be attached to your camera. If you bought the Rebel T1i kit, then
you probably got an 18–55mm lens. If you bought the body-only package,
then you should have bought a lens separately. You can learn how to attach
and remove a lens on pages 33–34 of the T1i manual.
• The power switch on the top of the camera powers up the camera (as long as
you have a charged battery installed). If it’s the first time you’re turning the
camera on, then the camera will prompt you to enter the date and time. Page
29 will walk you through setting the date and time, and page 30 will show
you how to set the language that you want to use in the camera’s menus.
• Finally, the camera includes a shoulder strap. The best way to ensure that
your camera doesn’t get damaged is to attach the shoulder strap and use it!
The camera will be more secure and easier to carry if you have the strap attached.
Page 23 of the T1i manual shows how to attach the strap.
If you’ve shot only with a point-and-shoot camera, then you’ll find much to like
about working with an SLR. The bright, clear viewfinder, the ability to change
lenses, and the advanced manual controls will give you far more creative power
than you probably had on your point-and-shoot camera. If you’re an old-school
SLR film shooter, then the switch to digital will bring you huge improvements in
workflow, image editing, and overall image quality.
Obviously, with all the power packed into a camera like the Rebel T1i, you have a
lot to learn. However, since the camera also has advanced auto functions, you can
get started shooting with it right away and, to a degree, use it just like you used
your point-and-shoot.
The best way to learn your camera is to use it, so before we look at the specific
parts and components of your T1i, you should do a little snapshot shooting just
to get your hands on the camera and get a feel for the general control layout.
[get this widget]
Powered by Blogger Tutorials
My Review about canon 500d
Sunday, September 6, 2009
I guess it is safe to assume that the expected 15 MP sensor of the 500D would be quite similar if not the same as that of the 50D. So I just compared the “noise sample shots” of the 40D, 50D, and 450D at dpreview.
Visible noise on the “gray patches” of the 450D is worse than 50D at ISO 1600, but I would also say that the 50D’s ISO 3200 is worse than the 450D’s ISO 1600… same for 800 on the 450D vs. 1600 on the 50D. So we cannot expect a full stop gain in shutter speeds without additional noise.
And this is even before taking the impact of noise reduction on fine detail into account: While the 100% crops of the “queen’s head” used by dpreview of course has a larger magnification on the 50D due its increased resolution, it appears to me that visible detail is actually worse in the 50D, even when comparing shots at the same ISO speed!
Of course this could be due to a slightly different test setup (the two cameras were not tested directly against each other).
Comparing 40D with 450D, I’d say 450D clearly wins. While “grey patch” noise is worse at 1600, a lot of fine detail is actually preserved on the “queen’s head”, making it look better than that of the 40D.
Well, its of course a lot of speculation trying to judge from the 50D to the 500D, but I doubt that at the same resolution the 500D is any better than the 50D.
@Gusto: AF micro adjustment would indeed be interesting… but in its current implementation in the 50D, 5D Mk. II, and 1Ds Mk. III you can — AFAIK — only set a single AF offset value for all focal ranges. But often lenses tend to missfocus differently at different range. So I’d rather prefer to have well-calibrated lenses out of the box. :-)
@Calvin: I guess the added value of the xxD is more in improved or “more professional” user interface, more rugged body, some basic weather sealing (IIRC), and of course AF precision and speed. That’s why we probably won’t have more cross sensors than the center one in any xxxD anytime soon.
[get this widget]
Powered by Blogger Tutorials
canon 500d final specs
Final Specs?
People keep emailing about the Rebel, these are the specs as I know them. A couple of updates from previous posts, some of it is the same.
Specs
mp: 15.1
ISO: 100-3200
Proc: DIGIC IV
LCD: 3″ VGA LCD
crop: 1.6
FPS: 3.5
AF: 9 Point AF
AF: Face Detection
Battery: LP-E5
Feature: LiveView
Feature: Movie Mode w/contrast detect AF
Announcement: January 24, 2009 (?)
Possible Feature? [CR3]
I am being told you may see the jog wheel finally added to the Rebel line. $200 Canon cameras have it, why shouldn’t the Rebel?
The XSi may not be discontinued. It could stick around for 6 months or so. So yes, that would make 3 Rebel’s in the EOS lineup.
[get this widget]
Powered by Blogger Tutorials


