
Canon T1i,500d,kiss x3 Live View shooting
Sunday, August 16, 2009
The Canon T1i is equipped with Live View shooting which allows you to take photos while viewing the LCD screen. If you're like me, you've tried using the Live View feature with poor to down right horrible results! Over the last few weeks, I've played around with Live View shooting and have come up with a few tips to help you out!
Before we go any further, I want to point out that Canon implemented this feature for "studio" and "tripod" shooting. It was not developed for shooting high action sports or subjects with a lot of movement.
On page 106 of the Canon T1i Manual you will find instructions for the Live View Shooting feature.
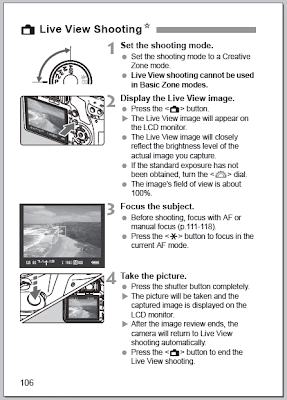
1. The first step is to set the mode dial to P (Program), TV (Shutter Priority), AV (Aperture Priority), M (Manual) or A-DEP (Automatic Depth of Field).
2. The second step is to press the "Camera Icon" button located on the back of the Canon T1i next to the LCD screen. Once you do this you will see the live view image on the LCD screen.
3. The third step is to select your Live View focusing mode. While the Live View image is displayed on the LCD screen, you can press the "Set" button located in the middle of the four way buttons located on the back of the Canon T1i. From here you can select one of three AF modes...Live View, Live View with Face Detection, and Quick Mode.
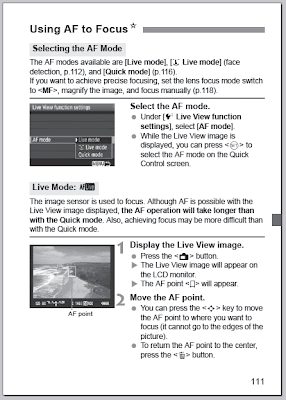
- Live View will focus while keeping the image on the LCD screen at all times, however, this AF mode is very slow.
- Live View with Face Detection will focus on the subjects face while keeping the image on the LCD screen at all times. This mode is even slower than Live View AF and is utterly useless.
- Quick Mode will focus much quicker than the first two AF modes, but the Live View on the LCD screen will be interrupted momentarily while the camera focuses.
- You can also switch your lens to MF (Manual Focus) which will allow you to manually focus the image on the LCD screen. If you choose to use manual focus, try pressing the "Magnifier Icon" located to the right of the thumb rest on the back of the Canon T1i to magnify the image. This will enlarge the image on the LCD screen, making it easier for you to see if the subject is in focus.
In my experience, I highly recommend shooting with the Quick Mode option when in Live View mode.
4. The final step is to focus using the "Star Icon" located just to the right of the thumb rest on the back of the Canon T1i. Once focus is achieved, press the shutter button and the image will be captured.
Remember that the Canon T1i Live View shooting mode is designed to shoot subjects that do not move like landscapes, portraits, still life, etc...If you plan on shooting subjects with a lot of movement like tracking planes at an airshow, I highly recommend using the optical viewfinder and the normal focusing modes.


[get this widget]
Before we go any further, I want to point out that Canon implemented this feature for "studio" and "tripod" shooting. It was not developed for shooting high action sports or subjects with a lot of movement.
On page 106 of the Canon T1i Manual you will find instructions for the Live View Shooting feature.

1. The first step is to set the mode dial to P (Program), TV (Shutter Priority), AV (Aperture Priority), M (Manual) or A-DEP (Automatic Depth of Field).
2. The second step is to press the "Camera Icon" button located on the back of the Canon T1i next to the LCD screen. Once you do this you will see the live view image on the LCD screen.
3. The third step is to select your Live View focusing mode. While the Live View image is displayed on the LCD screen, you can press the "Set" button located in the middle of the four way buttons located on the back of the Canon T1i. From here you can select one of three AF modes...Live View, Live View with Face Detection, and Quick Mode.

- Live View will focus while keeping the image on the LCD screen at all times, however, this AF mode is very slow.
- Live View with Face Detection will focus on the subjects face while keeping the image on the LCD screen at all times. This mode is even slower than Live View AF and is utterly useless.
- Quick Mode will focus much quicker than the first two AF modes, but the Live View on the LCD screen will be interrupted momentarily while the camera focuses.
- You can also switch your lens to MF (Manual Focus) which will allow you to manually focus the image on the LCD screen. If you choose to use manual focus, try pressing the "Magnifier Icon" located to the right of the thumb rest on the back of the Canon T1i to magnify the image. This will enlarge the image on the LCD screen, making it easier for you to see if the subject is in focus.
In my experience, I highly recommend shooting with the Quick Mode option when in Live View mode.
4. The final step is to focus using the "Star Icon" located just to the right of the thumb rest on the back of the Canon T1i. Once focus is achieved, press the shutter button and the image will be captured.
Remember that the Canon T1i Live View shooting mode is designed to shoot subjects that do not move like landscapes, portraits, still life, etc...If you plan on shooting subjects with a lot of movement like tracking planes at an airshow, I highly recommend using the optical viewfinder and the normal focusing modes.
[get this widget]
0 Comments:
Powered by Blogger Tutorials


