
Shot Composition Varying
Saturday, July 9, 2011
A fundamental part of visual storytelling is variety. If your entire video consists of one single shot, it's going to be hard to keep the audience engaged for the duration of the story. That's why in most videos and movies there are a variety of shots or compositions that are used to enhance the storytelling. Keeping in mind the tips from our lesson Framing and Composition, check out the most common types of these shots below.
To help illustrate these various shots, we have taken still images from two recent Vimeo HQ videos, Vimeo Man and Texas Intern. Let's dive into these examples!

EWS - Extremely Wide Shot (or Establishing)
Establishing shots are shown towards the beginning or end of a scene, to set the stage and show the full environment. Here we show the exterior of Vimeo HQ, so the audience knows where the story is about to take place.

WS - Wide Shot
Wide shots show the whole subject and their surrounding environment. In this shot, we show Matt at his desk, but also leave it enough room in the shot so that we can see that others are present.

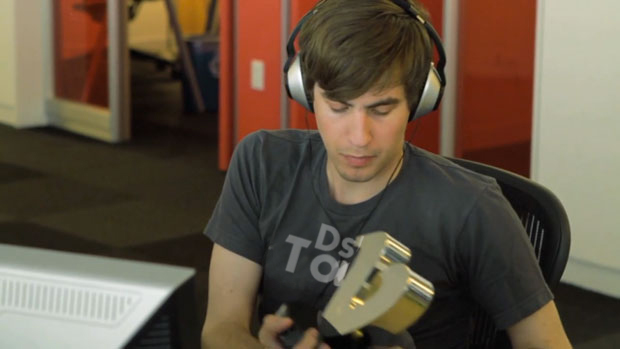
MS - Mid Shot
The Mid Shot gets closer to the main subject, showing more detailed gestures and body language. Here is Matt coming upon Vimeo Man in disbelief.

MCU - Medium Close Up
Medium Close Ups are just a touch closer than Mid Shots, but give greater detail, in this case it's emphasizing Matt and his obsession with all things dslrtool.com.

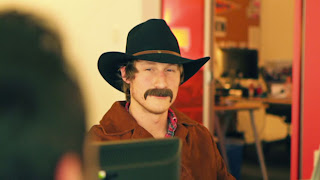
CU - Close Up
Close Ups fill the frame almost entirely with the subjects face. This emphasizes a character's facial expressions and helps the audience understand their reactions. Here is a close up shot of the Texan, blowing smoke from his pistol while squinting his eyes.

ECU - Extreme Close Up
Extreme Close Ups are super close to the subject, usually detailing just one part of their face, like the eyes or mouth. In this case, it's Vimeo Man's flashy glasses.

Cut-In
Cut-Ins, also known as insert shots, typically show objects or props that a character is manipulating. For example in the shot above we see the Texan's pistol as he is firing it.

Two-Shot
Two-Shots show two subjects in the frame and their spatial relation to one another. Usually both are positioned to fill up roughly the same amount of space within the frame. Two shots are often used during dialogue scenes like in the shot above where Andrea is explaining dslrtool.com to Matt.
OTS - Over The Shoulder Shot
Over The Shoulder shots are also used in dialogue scenes to show conversations between two people but with an emphasis on a particular character's perspective. Here we see Dan and the Texan discussing modes of transportation.
All of these common shot types emphasize different elements of your video. Whether it's the setting, a facial expression, or an object in an insert shot, they all help to tell the story by focusing the viewers attention. It's up to you as a video maker to tell your story in a series of shots, so think of what you want to convey and emphasize that with your shot selection. You'll find that a good dose of shot variety helps keep your audience engaged and watching, and that's a good thing!
Thank you to VIMEO.COM


[get this widget]
To help illustrate these various shots, we have taken still images from two recent Vimeo HQ videos, Vimeo Man and Texas Intern. Let's dive into these examples!

EWS - Extremely Wide Shot (or Establishing)
Establishing shots are shown towards the beginning or end of a scene, to set the stage and show the full environment. Here we show the exterior of Vimeo HQ, so the audience knows where the story is about to take place.

WS - Wide Shot
Wide shots show the whole subject and their surrounding environment. In this shot, we show Matt at his desk, but also leave it enough room in the shot so that we can see that others are present.

MS - Mid Shot
The Mid Shot gets closer to the main subject, showing more detailed gestures and body language. Here is Matt coming upon Vimeo Man in disbelief.
MCU - Medium Close Up
Medium Close Ups are just a touch closer than Mid Shots, but give greater detail, in this case it's emphasizing Matt and his obsession with all things dslrtool.com.

CU - Close Up
Close Ups fill the frame almost entirely with the subjects face. This emphasizes a character's facial expressions and helps the audience understand their reactions. Here is a close up shot of the Texan, blowing smoke from his pistol while squinting his eyes.

ECU - Extreme Close Up
Extreme Close Ups are super close to the subject, usually detailing just one part of their face, like the eyes or mouth. In this case, it's Vimeo Man's flashy glasses.

Cut-In
Cut-Ins, also known as insert shots, typically show objects or props that a character is manipulating. For example in the shot above we see the Texan's pistol as he is firing it.

Two-Shot
Two-Shots show two subjects in the frame and their spatial relation to one another. Usually both are positioned to fill up roughly the same amount of space within the frame. Two shots are often used during dialogue scenes like in the shot above where Andrea is explaining dslrtool.com to Matt.

OTS - Over The Shoulder Shot
Over The Shoulder shots are also used in dialogue scenes to show conversations between two people but with an emphasis on a particular character's perspective. Here we see Dan and the Texan discussing modes of transportation.
All of these common shot types emphasize different elements of your video. Whether it's the setting, a facial expression, or an object in an insert shot, they all help to tell the story by focusing the viewers attention. It's up to you as a video maker to tell your story in a series of shots, so think of what you want to convey and emphasize that with your shot selection. You'll find that a good dose of shot variety helps keep your audience engaged and watching, and that's a good thing!
Thank you to VIMEO.COM
[get this widget]
Powered by Blogger Tutorials
DSLR Video Importing & Conversion
Friday, July 1, 2011
For all those DSLR users out there, importing videos is pretty easy these days. We simply stick a Flash card full of our buttery DSLR footage into a computer, drag the files to a folder and presto-changeo! Everything is organized! But if you think you can just drop these files into your editing suite and start editing, you may have another thing coming. The reason being is that when videos come off your camera they are in a H.264 format, which is a finishing format. H.264 is a great format for say, uploading to Vimeo, but editing software such as Final Cut Pro does not support it (albeit, we are seeing a change to this). Consequently, editing with H.264 in Final Cut Pro means choppy playback and frequent crashes. To avoid this, you will need to convert your video files to a format that is better suited for editing.
In the tutorial video below, DSLR video expert Philip Bloom demonstrates a simple way to get your DSLR videos files converted and ready for editing!
First, He instructs you to import your video files:
Then, once your video files are on the computer, they are ready for conversion:
Now, you are ready to choose the settings that will convert your video files into a better format to edit with:
And there you are! After clicking "Go" you can cruise around Vimeo for some editing inspiration while MPEG Streamclip coverts your video files to an editing friendly format.
[get this widget]
In the tutorial video below, DSLR video expert Philip Bloom demonstrates a simple way to get your DSLR videos files converted and ready for editing!
First, He instructs you to import your video files:
- Plug your camera's compact Flash card into your computer using a card reader (don't use iPhoto etc.)
- Drag the entire contents of the DCIM folder from your compact Flash card onto your external hard drive.
- Discard the thumbnail files (.THM Files).
Then, once your video files are on the computer, they are ready for conversion:
- Download the free software, MPEG streamclip and open it.
- To convert all of your video files at once, go to "List" select "Batch List" and then select "Add Files". Next, select all of the files you wish to convert.
- Click "To Batch" select "Export to QuickTime" and hit "OK".
- You do not want to "join all the files" as it is easier to organize them separately, nor do you want to"Fix time code breaks".
- Create a new folder and click "Select".
Now, you are ready to choose the settings that will convert your video files into a better format to edit with:
- Philip Bloom recommends you use Apple XDCAM EX 1080p30 (35 Mb/s VBR) if you don't plan on editing the file later with software such as Cinema Tools.
- Turn Quality to 100%.
- Make sure it is Unscaled and deselect "Interlaced Scaling" and click on "To Batch".
- Click "Go".
Pro tip...
Use ProRes 422 as a substitute to Apple XDCAM EX 1080p30 for a higher quality yet less compressed (larger file) format!
[get this widget]
Powered by Blogger Tutorials


