
The LCD Status Display of canon eos 500d/kiss x3/t1i
Monday, September 21, 2009
The LCD Status Display
In addition to the in-viewfinder status display, the T1i also shows a lot of status
information on the rear LCD. What’s displayed on the screen varies depending
on what mode you’re in, simply because in some modes you don’t have as much
manual control and so don’t need as much status feedback. In Full Auto mode,
your screen should look something like the image on the next page.
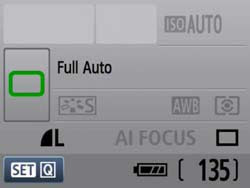
In Full Auto mode, the LCD screen should look something like this.
As you can see, you can easily tell how many shots are remaining, how charged
the battery is, and the image format that you’re shooting in. The camera also
shows what light-metering mode you’re using, which, to be honest, is kind of
strange, because you can’t actually change this when shooting in Full Auto.
When you half-press the shutter button to tell the camera to focus and meter,
it displays its chosen shutter speed and aperture at the top of the status display.
We’ll explore what these mean in later chapters.
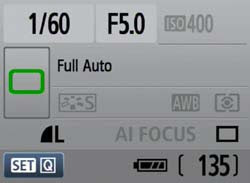
After you half-press the shutter button, the status screen will show
your shutter speed and aperture.
Just below the viewfinder, you can see a small black window. This is a sensor that
detects when you have the camera held up to your face. As you raise and lower
the camera, the 500d automatically disables and enables its LCD screen, so that it
doesn’t distract you while shooting. You can also turn the display off completely
by pressing the DISP button. Pressing it again reactivates the screen.
Shoot some more in Full Auto mode and get comfortable with the camera’s controls.
Even though the camera has a lot of other buttons and dials, you don’t really
need to worry about them right now.
TIPs
If you wear glasses and like to remove them when shooting, you can use the diopter control, the small knob next to the viewfinder, to compensate for some near- or farsightedness. Turn the knob until the nine autofocus boxes inside the viewfinder are sharp. Note that the diopter may not be able to completely compensate for extremely bad vision. Also, you’ll have to change it again if you put your glasses back on. If the viewfinder ever inexplicably goes out of focus, it might just be that you bumped the diopter knob. Turn it until focus is restored. If the diopter does not offer enough correction, you’ll want to look at Canon’s replacement diopters.


[get this widget]
In addition to the in-viewfinder status display, the T1i also shows a lot of status
information on the rear LCD. What’s displayed on the screen varies depending
on what mode you’re in, simply because in some modes you don’t have as much
manual control and so don’t need as much status feedback. In Full Auto mode,
your screen should look something like the image on the next page.

In Full Auto mode, the LCD screen should look something like this.
As you can see, you can easily tell how many shots are remaining, how charged
the battery is, and the image format that you’re shooting in. The camera also
shows what light-metering mode you’re using, which, to be honest, is kind of
strange, because you can’t actually change this when shooting in Full Auto.
When you half-press the shutter button to tell the camera to focus and meter,
it displays its chosen shutter speed and aperture at the top of the status display.
We’ll explore what these mean in later chapters.

After you half-press the shutter button, the status screen will show
your shutter speed and aperture.
Just below the viewfinder, you can see a small black window. This is a sensor that
detects when you have the camera held up to your face. As you raise and lower
the camera, the 500d automatically disables and enables its LCD screen, so that it
doesn’t distract you while shooting. You can also turn the display off completely
by pressing the DISP button. Pressing it again reactivates the screen.
Shoot some more in Full Auto mode and get comfortable with the camera’s controls.
Even though the camera has a lot of other buttons and dials, you don’t really
need to worry about them right now.
TIPs
If you wear glasses and like to remove them when shooting, you can use the diopter control, the small knob next to the viewfinder, to compensate for some near- or farsightedness. Turn the knob until the nine autofocus boxes inside the viewfinder are sharp. Note that the diopter may not be able to completely compensate for extremely bad vision. Also, you’ll have to change it again if you put your glasses back on. If the viewfinder ever inexplicably goes out of focus, it might just be that you bumped the diopter knob. Turn it until focus is restored. If the diopter does not offer enough correction, you’ll want to look at Canon’s replacement diopters.
[get this widget]
0 Comments:
Powered by Blogger Tutorials


