
Canon eos 500d/t1i body parts
Saturday, November 21, 2009
Body Parts
As you work through the rest of this book, you will become well-versed in all of
the T1i’s controls. Let’s take a quick look at the different interface elements on the
T1i so that you understand what controls I’m referring to as you work through
the rest of the book.
Camera Top
You should already be familiar with the power switch and Mode dial on the top
of the camera. We’ll be exploring all of the mode options throughout the rest of
the book.
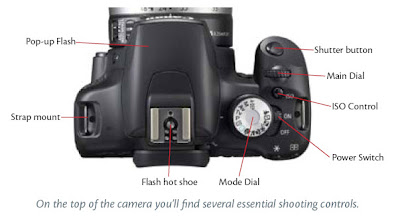
• If you’ve been shooting, then you also already know where the shutter button
is and understand that it has two positions, a half-press position for focusing
and a full press for taking a shot.
• Just behind the shutter button is a Control Wheel. You’ll use this for changing
parameters such as aperture and shutter speed.
• Behind the Control Wheel is the ISO button, which is used for setting the ISO
speed of the camera. You’ll learn about this in Chapter 6.
• Finally, just above the viewfinder is a hotshoe for mounting an external flash
unit.
Camera Front
The front of the T1i has minimal controls, but the few buttons that are there are
ones you’ll use often.
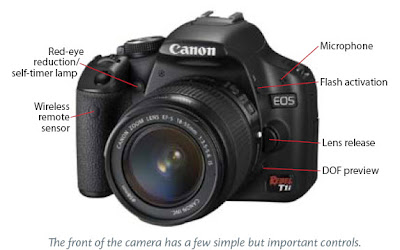
• The Flash button pops up the camera’s internal flash. In Full Auto mode, the
flash pops up automatically whenever the camera thinks you need it. In most
other modes, you decide when to use the flash and press this button to activate
it.
• Note the position of the microphone, which is used during video recording.
You’ll want to be very careful not to cover this with your fingers while
shooting.
• You’ll press the lens release button any time you want to remove the lens
from your camera. Press and hold the button while twisting the lens
counter-clockwise.
• The depth-of-field preview button is used to get an idea of how much of your
image will be in focus. We’ll explore it in Chapter 7.
• On the front left of the camera is a sensor for Canon’s optional RC-1, RC5 wireless
remote (or a compatible third-party remote). The camera communicates
with the remote through the sensor on the front of the hand grip. In addition
to wireless remotes, the T1i is also compatible with Canon’s RS-60E3 wired
remote.
• The red-eye reduction/self-timer lamp serves two purposes. When shooting
with the flash in red-eye reduction mode, this lamp flashes to try to reduce
red eye. When shooting with the self-timer, the lamp flashes to indicate that
the camera is counting down to firing.


[get this widget]
As you work through the rest of this book, you will become well-versed in all of
the T1i’s controls. Let’s take a quick look at the different interface elements on the
T1i so that you understand what controls I’m referring to as you work through
the rest of the book.
Camera Top
You should already be familiar with the power switch and Mode dial on the top
of the camera. We’ll be exploring all of the mode options throughout the rest of
the book.

• If you’ve been shooting, then you also already know where the shutter button
is and understand that it has two positions, a half-press position for focusing
and a full press for taking a shot.
• Just behind the shutter button is a Control Wheel. You’ll use this for changing
parameters such as aperture and shutter speed.
• Behind the Control Wheel is the ISO button, which is used for setting the ISO
speed of the camera. You’ll learn about this in Chapter 6.
• Finally, just above the viewfinder is a hotshoe for mounting an external flash
unit.
Camera Front
The front of the T1i has minimal controls, but the few buttons that are there are
ones you’ll use often.

• The Flash button pops up the camera’s internal flash. In Full Auto mode, the
flash pops up automatically whenever the camera thinks you need it. In most
other modes, you decide when to use the flash and press this button to activate
it.
• Note the position of the microphone, which is used during video recording.
You’ll want to be very careful not to cover this with your fingers while
shooting.
• You’ll press the lens release button any time you want to remove the lens
from your camera. Press and hold the button while twisting the lens
counter-clockwise.
• The depth-of-field preview button is used to get an idea of how much of your
image will be in focus. We’ll explore it in Chapter 7.
• On the front left of the camera is a sensor for Canon’s optional RC-1, RC5 wireless
remote (or a compatible third-party remote). The camera communicates
with the remote through the sensor on the front of the hand grip. In addition
to wireless remotes, the T1i is also compatible with Canon’s RS-60E3 wired
remote.
• The red-eye reduction/self-timer lamp serves two purposes. When shooting
with the flash in red-eye reduction mode, this lamp flashes to try to reduce
red eye. When shooting with the self-timer, the lamp flashes to indicate that
the camera is counting down to firing.

[get this widget]
0 Comments:
Powered by Blogger Tutorials


