
T1i or canon eos 500d Camera Sides
Tuesday, November 24, 2009
Camera Sides
The left side of the camera (if you’re looking at it from behind) holds a rubber
door that covers three ports.
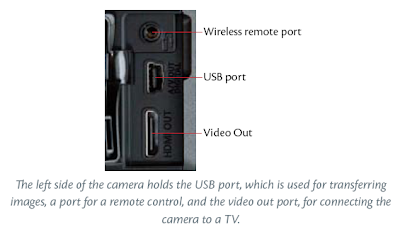
These ports are used for connecting your camera to a TV to play back images, for
connecting a wired remote, and for attaching your camera to a computer. We’ll
look at all of these options in more detail later.
The port cover doesn’t snap closed; instead, you kind of have to mash it into its
receptacle until it stays.
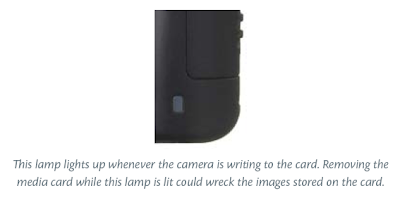
On the right side of the camera is the media slot cover, which you should already
have used when inserting your media card.
Note that just below the media slot cover, on the rear of the camera, there’s a
small light. Any time the camera is reading or writing data, this light will illuminate.
If you open the door when an image is being written, the camera will beep
and post a warning on the screen.

Camera Back
Obviously, it is the back of the camera where the bulk of the controls are housed,
alongside the LCD screen.
Above the LCD screen are the Menu and Display buttons, which are used to control
what is shown on the camera’s LCD screen.
To the right of the screen is a circular array of controls, along with exposure compensation
and and Live View buttons. These are the controls you’ll use in everyday
shooting to change shooting parameters.
In Chapter 1, we covered the diopter control, which allows you to adjust the
viewfinder to compensate for your glasses prescription.
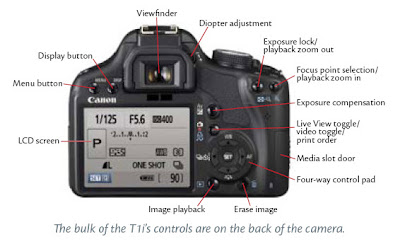
On the upper-right side of the camera are two additional buttons, which are used
to change focus point selection and to control exposure lock.
These controls also have blue magnifying glasses beneath them. Blue icons indicate
playback mode functionality. So, when reviewing your images, these two
buttons turn into zoom in and zoom out controls. (Similarly, the Live View button
does double duty as a Print button.)
Finally, at the bottom of the camera, you’ll find the Play button, which you should
have used already, and the Delete button, which we’ll cover in Chapter 3.
Camera Bottom
The bottom of the camera doesn’t have any controls, but it does have two important
features. There’s the battery compartment, which you’ve already used, and
there’s the tripod mount.


[get this widget]
The left side of the camera (if you’re looking at it from behind) holds a rubber
door that covers three ports.

These ports are used for connecting your camera to a TV to play back images, for
connecting a wired remote, and for attaching your camera to a computer. We’ll
look at all of these options in more detail later.
The port cover doesn’t snap closed; instead, you kind of have to mash it into its
receptacle until it stays.
On the right side of the camera is the media slot cover, which you should already
have used when inserting your media card.
Note that just below the media slot cover, on the rear of the camera, there’s a
small light. Any time the camera is reading or writing data, this light will illuminate.
If you open the door when an image is being written, the camera will beep
and post a warning on the screen.


Camera Back
Obviously, it is the back of the camera where the bulk of the controls are housed,
alongside the LCD screen.
Above the LCD screen are the Menu and Display buttons, which are used to control
what is shown on the camera’s LCD screen.
To the right of the screen is a circular array of controls, along with exposure compensation
and and Live View buttons. These are the controls you’ll use in everyday
shooting to change shooting parameters.
In Chapter 1, we covered the diopter control, which allows you to adjust the
viewfinder to compensate for your glasses prescription.

On the upper-right side of the camera are two additional buttons, which are used
to change focus point selection and to control exposure lock.
These controls also have blue magnifying glasses beneath them. Blue icons indicate
playback mode functionality. So, when reviewing your images, these two
buttons turn into zoom in and zoom out controls. (Similarly, the Live View button
does double duty as a Print button.)
Finally, at the bottom of the camera, you’ll find the Play button, which you should
have used already, and the Delete button, which we’ll cover in Chapter 3.
Camera Bottom
The bottom of the camera doesn’t have any controls, but it does have two important
features. There’s the battery compartment, which you’ve already used, and
there’s the tripod mount.
[get this widget]
0 Comments:
Powered by Blogger Tutorials


