
The Rebel T1i/canon eos 500D Menu System
Sunday, December 6, 2009
The Rebel T1i/canon eos 500D Menu System
Many of the Rebel T1i’s features are accessed through the camera’s menu system.
When shooting in a rapidly changing environment, such as a sporting event, busy
street, or birthday party, you’ll want to be able to quickly change camera settings,
so it’s important to be able to use the camera’s menus speedily and efficiently.
Fortunately, the T1i has a very good menu layout, so with just a little practice, you
should find that you can get to any option you want very quickly.
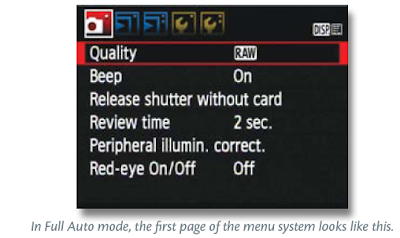
The contents of the menus change depending on what mode you’re in. In Full
Auto mode, the menus contain a smaller subset of the camera’s full menuing options.
In the other modes, you’ll find a complete selection of items.
In this section, we’re going to look at menu navigation so that you’ll know how
to go to a particular menu item—
something you’ll be doing a lot of throughout
the rest of this book.
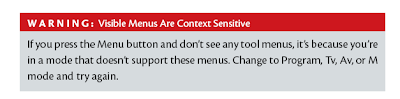
For the sake of this example, change the camera’s mode to P so that you can see
the full assortment of T1i/canon eos 500D menus.
To activate the menu, press the Menu button on the back of the camera. You can
do this whether you’re currently shooting or viewing images.
In Program mode, the T1i/canon eos 500D displays eight different menus, and the most recently
visited menu is always the one that is currently active when you enter the menu
system.
Each menu is represented by a tab at the top of the screen. The current menu is
brightly lit, and bounded by a white box, while the others are slightly faded. Each
menu contains a different set of options, but no menu contains more options
than can fit on one screen, so you don’t ever have to worry about scrolling up and
down to find a menu item.
When the menu is activated, the four semicircular buttons on the back of the
camera function as arrow keys.
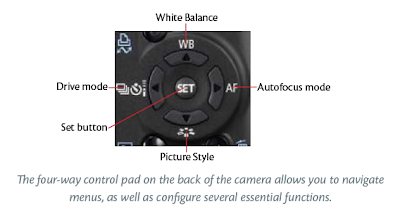
To change from one menu to another, use the left and right arrow keys. To select
an item in the menu, use the up and down arrow keys.

The menus are grouped by function. The first two menus contain shooting functions,
and so they sport camera icons on their tabs. The next two contain playback
functions.
The next three menus are tool menus. They contain various utility functions, such
as setting date and time, formatting your media card, and other options. I’ll be
referring to these menus as “tool menu 1,” “tool menu 2,” or “tool menu 3.”
Finally, there is a custom menu called My Menu, where you can define your own
custom set of options. We’ll explore this menu in Chapter 12.
Once you’ve selected the menu item that you want to access, press the Set button.
What happens next will depend on the feature you’ve chosen, which we’ll be
covering throughout this book.
So, if I tell you to access the Auto Rotate feature in tool menu 1, you’d press
the Menu button to activate the menu, then use the left or right arrow key to
navigate to the first tool menu, use the down arrow key to select Auto Rotate,
and then press the Set button to execute the feature. In the case of Auto Rotate,
a submenu will appear, which offers three different options. (Note that you can
also use the Main dial to cycle through the menus. This might be speedier for you
than using the buttons.)


[get this widget]
Many of the Rebel T1i’s features are accessed through the camera’s menu system.
When shooting in a rapidly changing environment, such as a sporting event, busy
street, or birthday party, you’ll want to be able to quickly change camera settings,
so it’s important to be able to use the camera’s menus speedily and efficiently.
Fortunately, the T1i has a very good menu layout, so with just a little practice, you
should find that you can get to any option you want very quickly.
The contents of the menus change depending on what mode you’re in. In Full
Auto mode, the menus contain a smaller subset of the camera’s full menuing options.
In the other modes, you’ll find a complete selection of items.

In this section, we’re going to look at menu navigation so that you’ll know how
to go to a particular menu item—
something you’ll be doing a lot of throughout
the rest of this book.
For the sake of this example, change the camera’s mode to P so that you can see
the full assortment of T1i/canon eos 500D menus.
To activate the menu, press the Menu button on the back of the camera. You can
do this whether you’re currently shooting or viewing images.
In Program mode, the T1i/canon eos 500D displays eight different menus, and the most recently
visited menu is always the one that is currently active when you enter the menu
system.
Each menu is represented by a tab at the top of the screen. The current menu is
brightly lit, and bounded by a white box, while the others are slightly faded. Each
menu contains a different set of options, but no menu contains more options
than can fit on one screen, so you don’t ever have to worry about scrolling up and
down to find a menu item.
When the menu is activated, the four semicircular buttons on the back of the
camera function as arrow keys.

To change from one menu to another, use the left and right arrow keys. To select
an item in the menu, use the up and down arrow keys.

The menus are grouped by function. The first two menus contain shooting functions,
and so they sport camera icons on their tabs. The next two contain playback
functions.
The next three menus are tool menus. They contain various utility functions, such
as setting date and time, formatting your media card, and other options. I’ll be
referring to these menus as “tool menu 1,” “tool menu 2,” or “tool menu 3.”
Finally, there is a custom menu called My Menu, where you can define your own
custom set of options. We’ll explore this menu in Chapter 12.
Once you’ve selected the menu item that you want to access, press the Set button.
What happens next will depend on the feature you’ve chosen, which we’ll be
covering throughout this book.
So, if I tell you to access the Auto Rotate feature in tool menu 1, you’d press
the Menu button to activate the menu, then use the left or right arrow key to
navigate to the first tool menu, use the down arrow key to select Auto Rotate,
and then press the Set button to execute the feature. In the case of Auto Rotate,
a submenu will appear, which offers three different options. (Note that you can
also use the Main dial to cycle through the menus. This might be speedier for you
than using the buttons.)

[get this widget]
0 Comments:
Powered by Blogger Tutorials


